Service Level Agreements
Adding New ClientsCopying & Moving FeaturesProducing a PDFAdministrationLinking to a SLADecommissioning EquipmentLinking AssetsLinking Services to SLAsDecommisssioning a ServiceReportsGeneralAppendix 1Appendix 2Appendix 3Appendix 4GlossarySetting Up an SLA Client
Adding a New Client
Within the SLA module in ServiceView, you can add, edit and delete SLA clients.
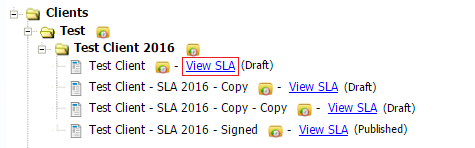
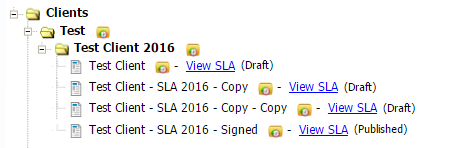
In ServiceView each version of a client's SLA (whether that be a draft, current, published or archived version) is considered to be an individual client. These individual clients can then be stored under a Slient Folder that is created.
Therefore within ServiceView there will be several client versions for each SLA client at any one time.
To add a new client:
Navigate to the ServiceView homepage and enter your username and password and click Log in.
If you are unable to login successfully, contact your team manager or a ServiceView administrator.
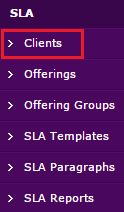
Once logged in, navigate to the left side menu and select SLA and click the Clients option.
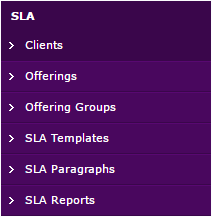
This will bring up a list of clients. There are then two ways to add a client depending on what view you are using, from the Tree View or Table View.
Tree View
Choose the Tree View tab.

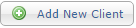
Then at the top of the screen, select the Add New Client button.
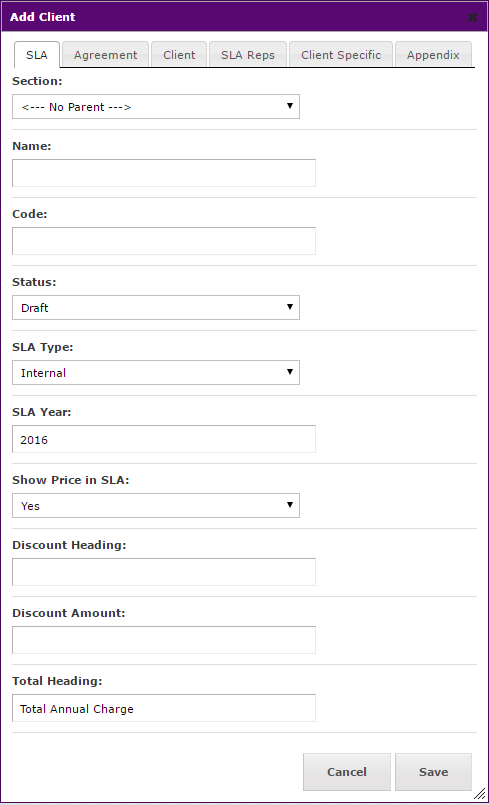
This will bring up the "Add Client" dialog. Use the tabs up the top to populate the client's profile information.
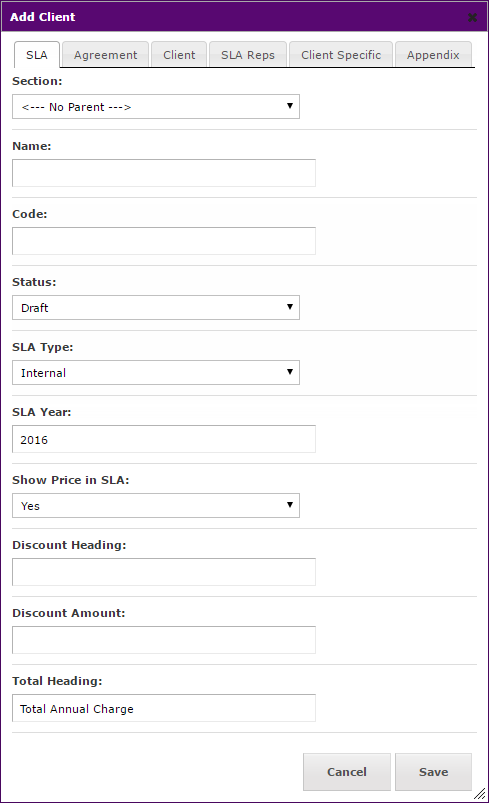
Table View
Choose the Table View tab.

Click on the  button to add a new client.
This will bring up the "Add Client" dialog. Use the tabs up the top to populate the client's profile information.
Adding a Client Offering
Client Offerings are the equivalent of the service catalogue items in ServiceView. They are categorised into Client Offering Groups, e.g. IS01 File Storate. Then a Client Offering, e.g.Shared drive isilon storage.
So the client offering in the above scenario would be "IS01 File Storage: Shared drive isilon storage.
The Client Offerings represent any services (sometimes customised/ non-standard for a particular client) or catalogue items that a client can purchase from ITS as part of an SLA.
To add a client offering:
Click the SLA tab on the side menu and then click on Clients.
The tree view will be displayed with the list ofclients by default. You can however click on the Table View tab next to Tree View to view the clients in a table format.
Tree View
From the tree view, find the client that you are looking for and click the View SLA button that is displayed in blue.

Table View
From the table view, find the client you are looking for and click on that client.
Then, at the top of the page, click the Add Client Offering button.
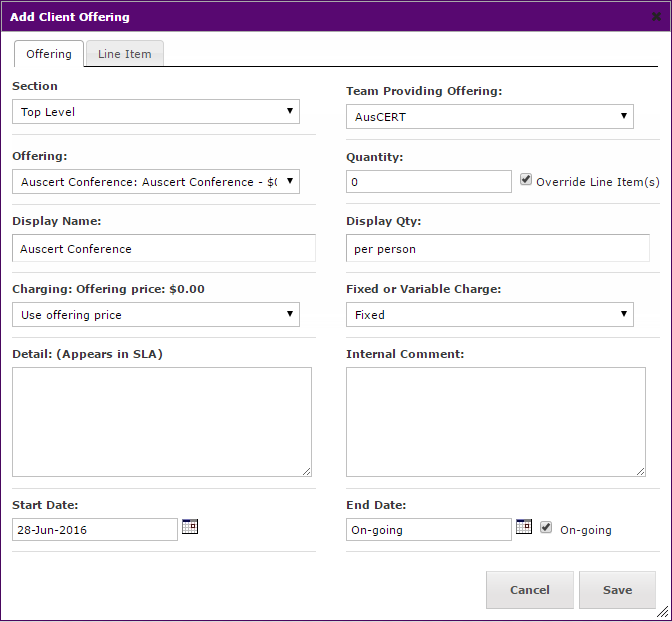
The Add Client Offering dialog will appear. Fill in the details as required.
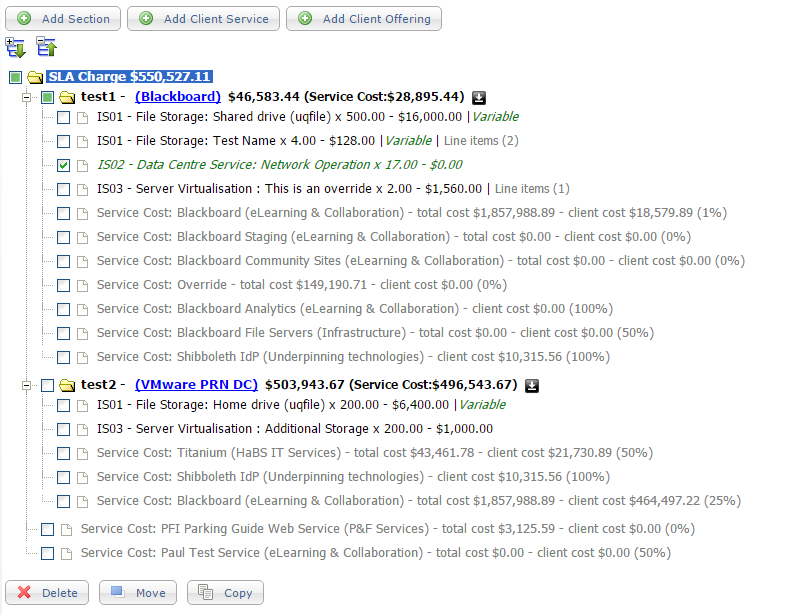
Adding a Section
You can use sections to categorise or group offerings, they work in a similar manner to folders, but you tie services to them in the case of applications that are specific to a client.
To add a section, use the Add Section button at the top left.
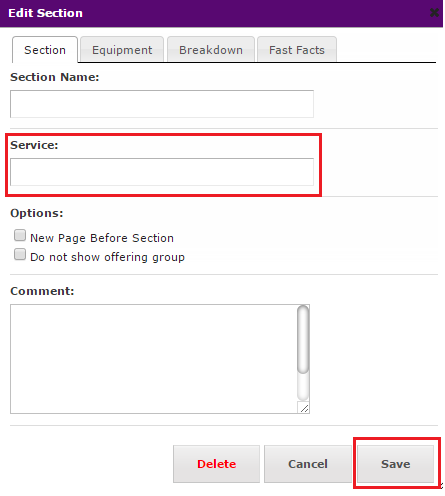
Then give the section a name. At this point you can also tie a service ot the section, so if the section is for the Blackboard application, you can then start typing Blackboard int othe service fields and the options for Blackboard services will some up. You can then select the service yoo wish to tie to that section.
If you are unsure about the correct service, you can use the line item tab to tie equipment to the offering. This is useful because if the equipment that you have linked as a line item to an offering becomes decommissioned or changes in status, then a flag will display in the offering for the client and an Incident will be created, promting you to update the SLA.
Either select Add Client Offering if you are adding a new offering or double click on an existing offering to bring up the Client Offering window.
Then go to the Line Item tab, where you can fill in the equipment name.
You should use the fields in the process of adding the equipment. Once the equipment details ahve been added, select Save
Removing an Equipment Link
If you have linked equipment to an offering through the line item tab, but you wish to remove or change the equipment, you will need to delete the line item and re-add it with the correct details. Equipment and asset values cannot be edited for line items once they have been added.
Process:
Navigate to the Line Item tab for the offering that contains the equipment that you want to remove.
Then using the tick box on the left side of the table, select the line item containing the equipment that you want to remove and use the red X to delete it.
Then select Save
The line item should now be removed.
 Note: Once equipment or assets have been added as a line item and saved into the table, if you have selected the wrong equipment or asset or want to change it, you cannot edit saved line items. You will need to remove the line item altogether and add it again.
Linking an Asset With an Offering
Assets in ServiceView that are relevant to SLA's are databases, backups and websites.
When first adding an offering, you can use the line item tab to tie an asset to the offering.
Either select Add Client Offering if you are adding a new offering or double click on an existing offering to bring up the Client Offering dialog.
Then go to the Line Item tab, where you can fill in the asset name.
You should use the fields in the process of adding an asset. Once the asset details have been added, select Save.
Producing an SLA PDF Document
To produce an SLA PDF document, you need to ensure that you have assigned a "Template" to the client first.
To do this, navigate to the client and from the Layout tab, use the  button to assign a template if one does not already exist.

Once the client has a template, simply navigate to the Download SLA button on the top right to produce the PDF document.
Note: The document will take a few minutes to download.
Deleting a Client
To delete a client, navigate to the Clients tab in the SLA side menu.
Table View
Click on the Table View tab and find the client you wish to delete from the table and select the tick box on the left.
Scroll down to the bottom of the page and select the red "X" button. A window will now appear asking to confirm the deletion.
Click Delete Selected
Tree View
Select Tree View tab and find the client you are wanting to delete and double click on it. This will bring up the Edit Client dialog. From here there is a Delete button at the bottom in red that you can use to delete the client.
Deleting an Offering
To delete an offering, select the Clients tab in the SLA side menu.
Select the client via the View SLA button from the tree view or by clicking on the client from the table in the table view.
In the Sections tab for the client, you will see all of the sections and offerings listed in the tree for the client.
Find the offering that you want to delete and use the tick box on the left to select the offering (or multiple offerings). The offering once seleted will display in green.
Then select the Delete button on the bottom left.
A window will now appear asking to confirm the deletion, click Delete Selection
Deleting a Section
To delete a Section, navigate to the Clients tab in the SLA side menu.
Select the client via the View SLA button from the tree view or by clicking on the client name from the table in table view.
Make sure you are on the Sections tab (it should default to this tab).
You then have two options to delete a section:
- Double click on the Section you want to delete and the Edit Section dialog will open. Click the delete button to delete the section. Keep in mind any offerings within the Section will also be deleted.)
- Use the tick box on the left side to select the section you wish to delete and then click the delete button at the bottom. Keep in mind that any offerings within the Section will also be deleted.
Copying and Moving Features
Copying an Offering to Another Client
You can use the copy feature to copy offerings to other clients.
To copy one or multiple offerings to another client, navigate to the client's page and use the checkbox on the left to tick the individual offerings you wish to copy.
Select the  button.
Then choose the client youy wish to copy the offerings to from the drop down list or choose the Add New Client button if you want to create a new client for the offerings to be copied into, e.g. in the case of a draft version for the next year for a client, you may wish to create a new client called "School of Health 2017 Draft".
Select Save.
The offerings that were copied will appear under a section that will have been created called "Copied from - XXXX". You can then move the offerings to the correct section, create a new section for them or re-name the current secton by double clicking on it.
The copied offerings will also still be retained in their original form within the client version that you copied them from.
Copying a Section to Another Client
You can use the copy feature to copy entire sections to other clients. Any sections copied will copy the section name, any service that may be tired to that section as well as all of the offerings within the section to the other client.
To copy one or multiple sections to another client, navigate to the client's page and use the checkbox on the left to tick the sections you wish to copy.
Select the Copy button.
Choose the client you wish to copy the sections to from the drop down list or choose the Add New Client button if you want to create a new client for the sections to be copied into, e.g. in the case of a draft version for the next year for a client, you may wish to create a new client called "School of Health 2017 Draft"
Select Save.
The selections that were copied will appear as they were when they were copied i.e. the same name of the section with the offerings displayed as they were in the pervious client.
The copied sections will also be retained in their original form within the client version that you copied them from.
Copying an Entire Client
You can also use the Copy Entire Client feature to copy all information for a client to another client or a new client. This includes all offerings, sections, documents, linked services and any client profile information in the Edit Client section.
To copy the entire client, navigate ot the main page for the client and click on the Edit Client button.
Then select the Copy Entire Client button at the bottom of the window.
This will then copy the entire client and you should see a processing window to indicate that the request is being processed.
Wait a few moments and then go to the SLA tree view or table view and you will notice a newer version of the client with "Copy" at the end.
All of the client information will now be in this client. You can edit the client to change the name to something ese.
Moving an Offering to Another Client
The main difference between moving and copying is when you move a client, it will be moved entirely from that client to the other client and will no longer remain in the original client that it was moved from.
The process is the same as copying a client but you use the Move button at the bottom.
The offerings that were moved will appear under a section that will have been created called "Moved from - XXXX". You can then moved the offerings to the correct section or re-name the current section by double clicking on it.
Note: As mentioned, the offerings will no longer appear in the previous client as they have now been moved to another client.
Moving a Section to Another Client
The main difference between moving and copying is when you move a section, it will be moved entirely from that client to the other client and will no longer remain in the original client that it was moved from.
The process is the same as copying a section but you use the Move button at the bottom.
Layout for Producing a PDF
You can generate a PDF of all the client information within the SLA module that can then be presented to the client for signature.
There are a few different types of PDFs that can be generated:
- SLA PDF
- SLA PDF with No Prices
- SLA PDF with Extra Page Breaks
- SLA PDF with Internal Comments
- SLA PDF: This is the standard PDF that is most commonly used.
- SLA PDF with No Prices: This will produce the same standard PDF but will display no prices for any sections, offerings and for the SLA totals either.
- SLA PDF with Extra Page Breaks: This produces the PDF but leaves page breaks within the SLA details.
- SLA PDF with Internal Comments: This will display the PDF as normal but for any offering where an internal comment field has been filled in, this internal comment will display in red below the offering.
Templates and Paragraphs
To produce a PDF document a client uses a template which is created in the SLA Templates section and that template is made up of paragraphs that are created within the SLA Paragraphs section.
Creating a Template
Navigate to the SLA menu in the side menu and then to the SLA Templates tab.
Use the  on the top right ot add a template.
Give the template a name that you can identify it as later, e.g. Standard Template or Faculty Template, etc.
Also give the template a title. The title field will appear as the title of the PDF document, so most template titles should be "ITS Service Agreement".
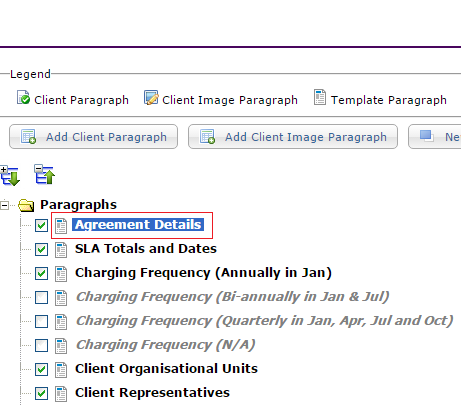
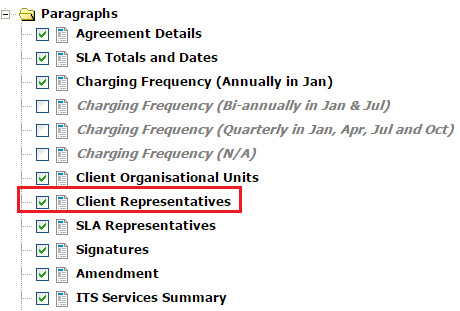
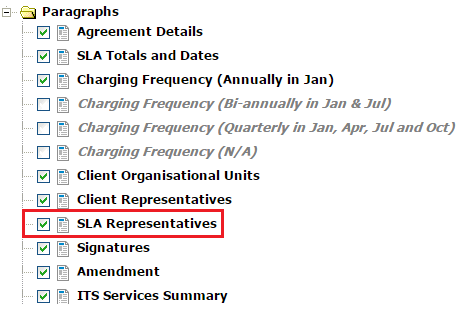
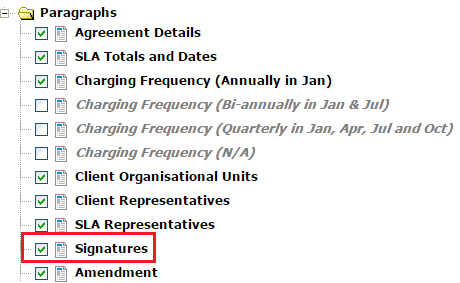
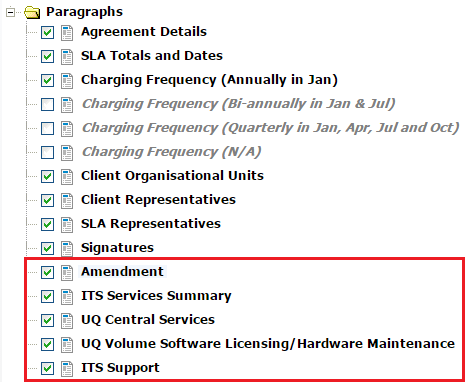
The template will be populated with all paragraphs from the paragraph list. If you do not want to include any paragraphs for the template, click on the paragraphs window on the right:

All paragraphs that appear in green and are checked down the left side will appear in the template. All paragraphs that appear in black and are not checked will not appear. To include or not include paragraphs you can use the check feature by clicking in the check box.

If you need a new paragraph that is not in the paragraph list, you will need to first go to the SLA Paragraphs tab in the SLA side menu and ceat the paragraph first. Once you have done that, the paragraph will then appear in the list of paragraphs for the template and you can ensure that it is the ncheck so that it is included in the template.
Creating a Template Paragraph
Navigate to the SLA side menu and select the SLA Paragraphs menu.
This will bring up a table for the paragraphs. Use the in the top right of the table to add a new paragraph.
This will open the Add SLA Paragraph dialog. Fill in the fields and click Save when done.
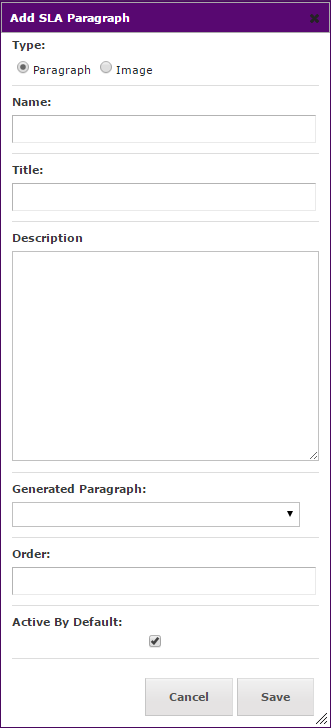
Fields explained:
Name: To identify the paragraph in the SLA Paragraphs list.
Title: This will be the title of the paragraph that will appear on the PDF document.
Description: The paragraph information/test that will appear on the PDF document.
Generated Paragraph: These paragraphs come from the Edit Client information or the offering information from the client and are already pre-set. They are for things like dates, signatures,SLA offering details etc. If you need to edit or add a new generated paragraph you will need to contact the ServiceView administrator as these paragraphs are hard coded in.
Order: Increments of 10 are used to order the paragraphs in terms of the order they will display in the template list. The order can be moved within the template later however, if desired. If you wish to add a new paragraph and have it appear between existing paragraphs, you can use a number between the range for the existing 2 paragraphs, e.g. Paragraph 1 is numbered 10 and Paragraph 2 is numbered 20, I want a paragraph between these two so I can make the paragraph order number 11 and it will appear in the middle.
Active by Default: This should be ticked unless you do not want the paragraph to display in the template list.
Once complete, the paragraph will now be included in the template list.
Assigning a Template to a Client
In order to produce a SLA PDF document, a template first needs to be assigned to the client so the PDF knows the layout it should take and what paragraphs to include or not to include.
To assign a template, navigate to the Clients tab in the SLA side menu and select the client you are working on.
When the client opens, navigate to the Layout tab. The layout tab contains the templates and paragraphs for that client that produce the PDF.

Once in the Layout tab, use the New Template button to choose a template from the list of templates that are produced via the SLA Templates feature.
Select the template you want to use from the Template list.
There are then two options when assigning a template, with option 1 being the preferred option for SLA's (standard practice):
- Select Use Template to use that template as is, where the paragraphs will be populated as template paragraphs and any editing done to them will also affect/be edited for any other clients using that same template.
- Then select Copy Template to copy all of the paragraphs within the template. The paragraphs will then become client paragraphs for that client, meaning that you can edit the paragraphs and make them specific to that client, without changing the template paragraphs for other clients using that template.
- Within the SLA details section on the PDF, each section within the client (usually sections will be Organisational Units for Faculties) will display on a new page, instead of just one after the other, making the format a lot easier to use and meaning sections can be removed and distributed to different OU clients from the PDF easily.
- Another graph will be automatically populated at the end of the SLA Overview sectrion on the PDF in addition to the original graph. This graph will automatically group any sections that have been named the same (excluding the numbers that may be used at the beginning) and use those like sections and the offerings inforamtion within them as pieces of the pie.
You can then use the check boxes for the paragraphs on the left to uncheck paragraphs if you do not want to include them on the pdf docuement.
You can also add your own client paragraphs that are specific just to that client from this layout tab and also add images.
Creating a Client Paragraph
If you have information that is specific to the client you are working on, instead of creating a "template paragraph" for it (as the template paragraph would appear on all templates) you can create a Client Paragraph via the Layout tab.
Go to the SLA Client tab in the SLA side menu and go to the top Layout tab.
Choose the  button to create a slient specific paragraph.
Fill in the details when the Add Client Paragraph dialog opens.
Fields explained:
Name: The name field is what you want to call the paragraph and will display as the name in the tree view.
Title: This is the title of the paragraph and will display as the title on the PDF document.
Description: This is for the paragraph text or information that will display on the PDF document.
Once the details have been filled in, click Save.
The client paragraph will automatically appear in the top of the tree view of the paragraphs, but you can use the drag and drop feature to re-position it ot where you would like it to appear.
You can identify client paragraphs by the following icon in the tree view:

Adding and Inserting an Image
You can insert an image (png or jpeg file type) as a paragraph that is specific to the client you are working on in order to have the image display on the SLA PDF document.
Go to the SLA Client page by selecting Clients in the SLA side menu and selecting the client. Then go to the top Layout tab.
Choose the  button to insert an image as a paragraph for that client.
The Add Image Paragraph dialog will open.
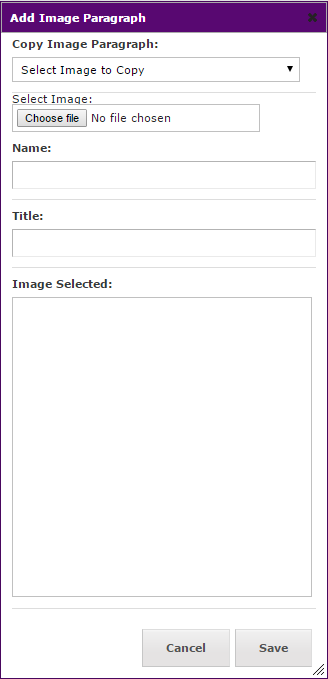
The first step is to choose the image you wish to add by selecting browse and finding the image from your computer files.
Once you have selected the image, the image will show a preview in the "Image Selected" window.
The next step is to give the image a name that you can recognise it from in the tree view.
Then give the image a title, this title will appear as the image title on the SLA PDF document.
Once you have completed all of these steps, click Save
The image will automatically appear in the top of the treee view of the paragraphs, but you can use the drag and drop feature to re-position it to where you would like it to appear.
You can identify client image paragraphs by the following icon in the tree view:

Ordering Paragraphs
To re-order and move paragraphs you can use the drag and drop feature by clicking on the paragraph you want to move and holding down the mouse and moving the paragraph. The order they are displayed in the tree view is the order they will populate onto the PDF document.
Deleting a Template
To delete a template from the master template list, navigate to the SLA side menu and select the SLA Templates tab.
Find the template you wish to delete in the table and use the check box on the left to check that template and then select the red "X" symbol at the bottom left of the table to delete.
A window will appear asking if you are sure, if you want to proceed, click the Delete Selected button.
Deleting a Paragraph
To delete a paragraph, navigate to the SLA side menu and select the SLA Paragraphs tab.
Use the check box to check the paragraph you wish to delete in the table and then select the red "X" symbol at the bottom left of the table to delete that paragraph.
A window will appear asking if you are sure, if you want to proceed, click the Delete Selected button.
Producing Graphs on the PDF
Standard SLA Client (Non Faculty Client)
Graphs are automatically generated in the client's PDF from the section and offering information in the Sections tab for the client.
SLA Overview Graph
This graph looks at the 2nd level sections for the client and includes those sections as pieces of pie in the graph. For sections where the offerings total very small amounts, these will be grouped together into an "Other" category, as they are too small to be individually represented as pieces of pie in the pie graph.
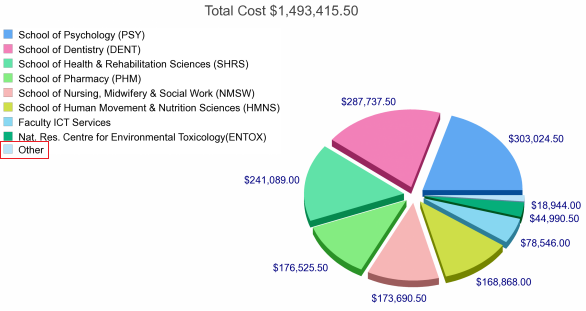
This graph will only populate if there is more than one section with offering information listed under it.
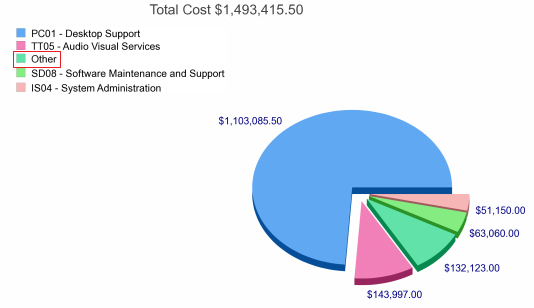
Technical Components Graph
This graph will automatically be produced by looking at and grouping the overarching offering groups of the offerings within the Sections as above for clients.The graph will only display if there is more than one offering group for the client, e.g. if the client just has Desktop Support Services offerings then it won't display, but if they have Desktop Support Services offerings as well as File Storage Services offerings then the graph will display.
This graph will also goup together any offering groups as "Other" where the $ amount is relevant to the overall total is too small to be individually represented on its own in the graph.
Faculty Client
To produce a Faculty client, generally a different template with different paragraphs is used, which provides an extra graph on the PDF.
A Faculty client generally has quite a large range of offerings and sections due to the many Organisation Units within the Faculty and therefore a different paragraph is used for the SLA Details section, which also produces another graph.
The standard SLA details paragraph is called SLA Details. For a Faculty client, the SLA Details (with seperate sections breakdown) paragraph is used instead.
This will create a SLA Details section on the PDF with the following two main differences from the standard SLA details paragraph.
Administration
Uploading a Document for a Client
You can upload and store documents within SLA clients, e.g. signed agreements, consumption reports, etc.
Navigate to the client using the SLA side menu and then clicking on Clients, then selecting the client you are after.
On the top right of the screen, select the Documents tab.

You can then use the Add Section button to create a section for your document if you want it to sit under a folder.
To add the document, select the  button.
The Add Client Docuement dialog will open.
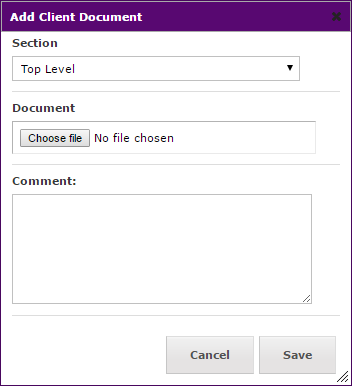
Use the Section field to select the section or folder you want the document to appear under. If you do not want it to appear under a section then leave this as Top Level.
Use the Document field to browse for the document from your computers files by selecting Choose File.
Use the Comment field to include optional informationexplaining what the docuement is, ofr your reference.
Granting and Restricting Access to SLA Clients
You can grant read, read and modify as well as full SLA edit access to particular ServiceView users using the Client Access button.
Navigate to the particular client that you would like to grant a user access to, using the SLA side menu and then selecting the Clients tab and then selecting the client from the list.
Note: Access is granted at the client version level, so if you want to grant access for somebody to view, for example, the draft as well as the published version you will need to do so for each individually.
Then select the Client Access tab from the right bar of tabs.

Use the  button on the right to add people to the table and grant them access.
The Add Client Access dialog window will open.
Start typing in the user's name that you are wanting to grant access to and options of users from within ServiceView will start to populate automatically. Select the desired person.
Then select the access type that you wish to grant. See below for descriptions of access types.
View SLA: Read/view only access. User cannot edit anything.
View/Modify SLA: User can read/view the client information as well as add and edit anything for the client except for information inthe Edit Client button.
View/Modify SLA and Edit Client: User has full access to view and edit any information for the client including the Edit Client button.
Once you have selected the person and the type of access, press Save. You will then see the user's access information appear in the Client Access table.
Creating a Table
Tables can be created within ServiceView paragraphs to present data in a table format in the PDF document.
You can use a (|) to create a column within a table and then use a return or new line to create a row.
Example:
|A|B|CCC|D|
|1|222|33|4|
Will produce a table that looks like this:
| A | B | CCC | D |
| 1 | 222 | 33 | 4 |
If you wish to have multiple lines of text within the one row in a table, you can use the (^) symbol to force the text to go to a new line.
Example:
|A|B|CCC^EEEEEE|D|
|1|222|33|4|
Will produce a table that looks like this:
| A | B | CCC EEEEEE | D |
| 1 | 222 | 33 | 4 |
Creating Folders for Clients
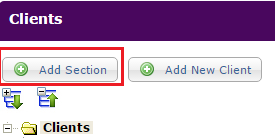
In the SLA Clients section you can create folder layers (similar to a shared drive) to store client agreements for different years, etc. using the Add Section button.
In the Client Documents section you can also create folder layers to store documents in, by using the Add Section button to create the folder.
SLA Status or Version Types
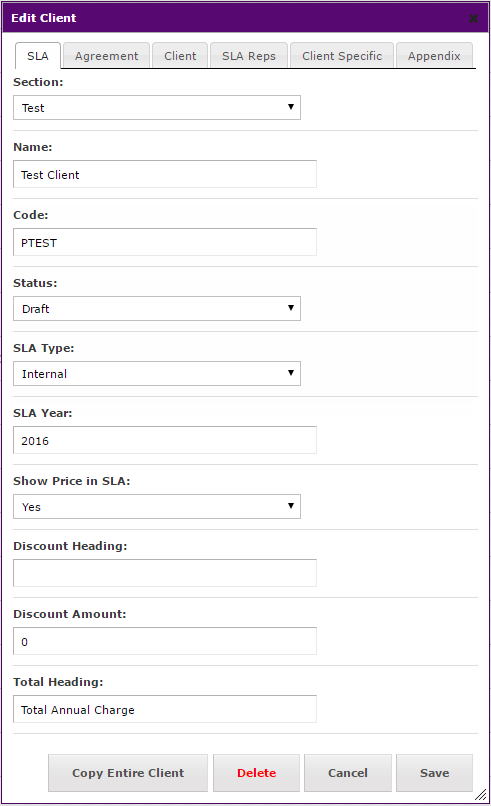
There are 4 different types of SLA clients or client versions that can be selected when adding a new client from the Status tab:
Draft: Draft versions are used at the end of year review time or throughout the year (for agreement amendments), as versions of the agreeement that are still being "worked on" or have not been agreed upon or signed off by the client.
E.g. at the end of the year SLA review time, you would create a "Draft" agreement that you would use to make any changes to the offering or service information. This would then be presented to the client once finished and once the client signs off on the agreement it would then change status to "Current" or "Published".
Current: Current versions for SLA's are the most current agreed to (signed off on) version for the client at that point in time.
E.g. at the beginning of the year, if a client has not signed off on their new agreement for that year, the current version of the client would be the previous years. However, if the client has signed off on the agreement for the new year, you would then make sure you have a current version for the year.
Note: A client should always have a current version listed for them, whether that be from the current year or from the previous year until the new agreement is signed off on.
Published: Published versions of SLA's are just a snapshot of the SLA at the time of signing and should include an uploaded image of the signatures in the layout. The published version will be a read only version by default as no changes should be made to this version as it is a record of the SLA that was signed. If changes were to occur the agreement throughout the year, they would be made to the current version.
Note: A client should always have published version listed for them, unless they are a brand new client who is yet to sign off on their agreement as yet.
Archived: Archived versions of SLA's are either previous year agreement versions that become archived when replaced by a new current version, or draft versions that were created but were never implemented but were to be kept as a record, rather than deleted. The archived version is also a read only version of the client that cannot be edited.
Changing the status of a client:
For existing clients, if you want to change the status of a clinet, you can do this from the tree view, either by double clicking on the SLA client to bring up the Edit Client dialog or you can also use the View SLA button at the end of the client list to open up that current version and then go to the Edit Client button to change the status

Linking Services, Equipment and Assets to an SLA
Equipment: A virtual or physical server being used by ITS or it's clients. Equipment information within ServiceView includes information such as equipment name, status, SLA client the equipment is for, the service the equipment is being utilised for, location, manufacturer and warranty information.
Service: A service is an activity performed which is either directly useful to the client or is underpinning other client facing services. It can be technical or non-technical. A service can be an activity or function that the organisation performs or that the organisation has purchased. Examples ofa service include Email, LDAP, Si-net, Procurement, Archibus.
Services can be linked to an SLA in 2 ways from the Owners tab in Edit Service by using the SLA field to select a client the service is for or by linkingthe service to a section directly within an SLA client version.
Asset: ITS owned information, system or hardware that is used in the course of business activities. Assets within ServiceView include backups, database, SSI Cert and website information.
In order to capture all relevant information for an SLA within ServiceView the functionality has been developed to be able to link services (applications), equipment (servers) and assets (backups) within an SLA so that when information changes for the service or equipment, a notification will be received of the change and then the SLA can be updated accordingly. This way changes to services and equipment do not get missed and forgotten to be updated within an SLA.
Linking Equipment to an SLA
Equipment or servers (physical hardware) can only be linked to an offering within an SLA using the line item feature. For SLA's where they have IS03 Server Hosting as well as IS04 System Admin support, and IS13 Data Backup the equipment should be linked to all offerings as a line item (not just the server hosting offering).
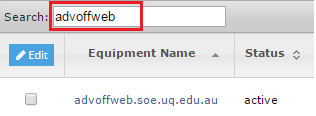
First, check that the equipment or server that you are wanting to link to the SLA is in ServiceView in the equipment list.
To do this, navigate to the Infrastructure tab on the side menu and then to Equipment.
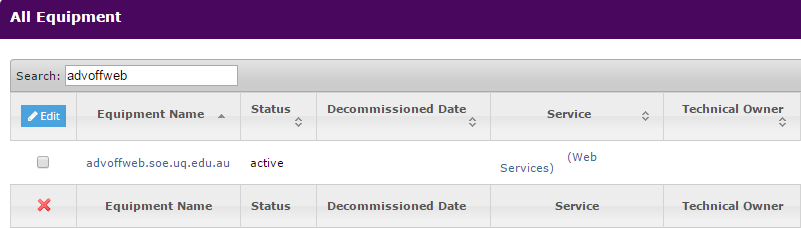
Then, use the search bar at the top left of the equipment table to search for the name of the server. If the equipment is in ServiceView you will see it come up in the table.
If the equipment is not in ServiceView, use the  button at the top right of the table to open the Add Equipment dialog.
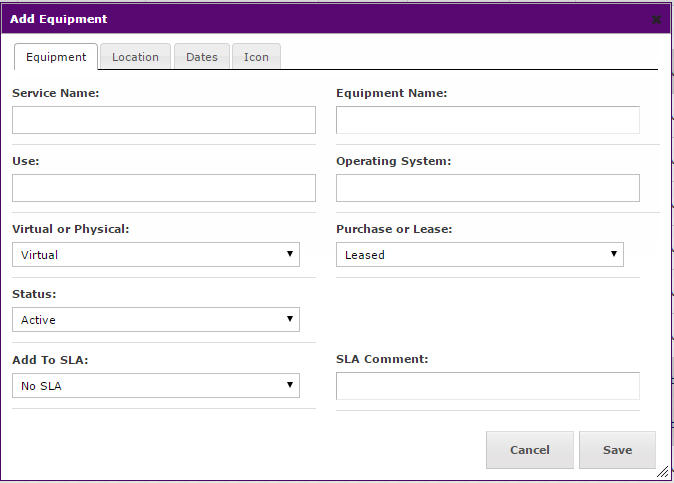
Equipment that is in ServiceView can then be linked to a SLA client through the line item feature.
Process:
Navigate to the client that you are wanting to link the equipment for by using the SLA side menu and selecting Clients.
In this example, the client is Advancement Office.

When adding a new offering for the client or editing an existing offering (by double clicking on it), use the Line Item tab to input the equipment information.
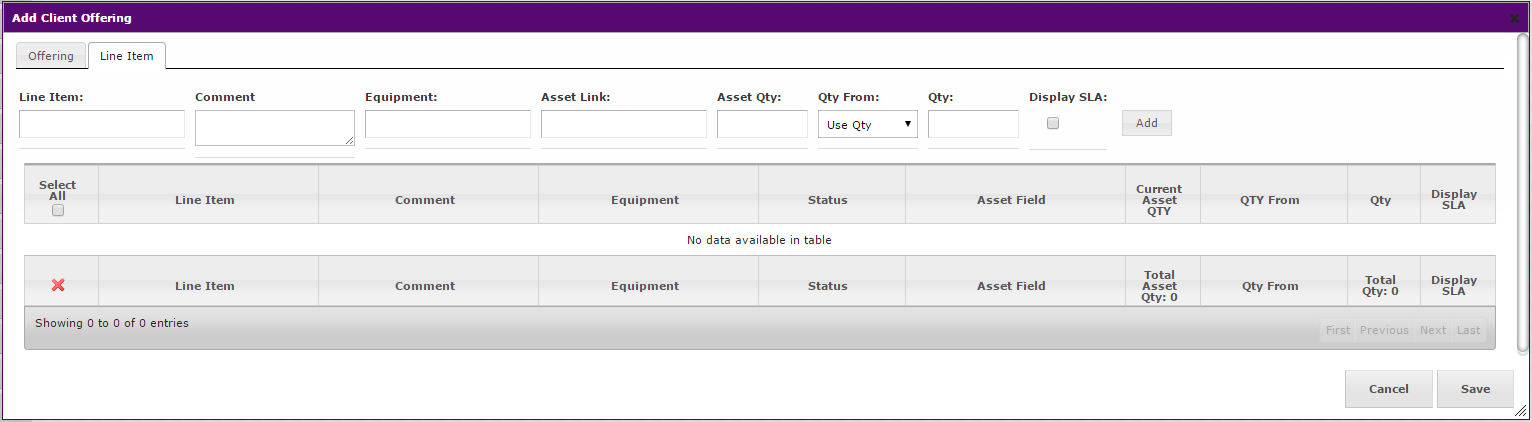
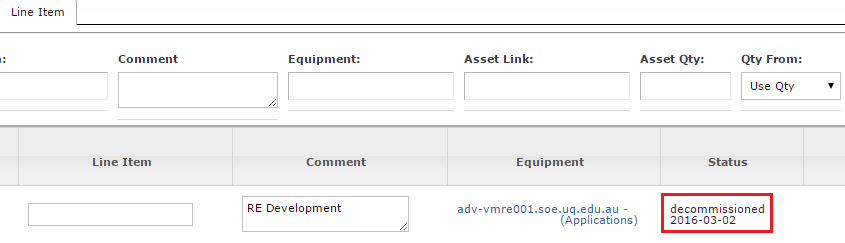
From this tab you will see the following fields that you can use to add information:
Line Item: This is a free text field that you can use to put in information, such as equipment name and other details.

Comment:This is another free text field for general information that you can have multiple lines within unlike the "Line Item" field.

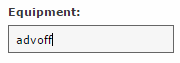
Equipment: This is an auto complete field which contains the list of equipment within ServiceView. Start typing the name of the equipment within this field and once it comes up in the list you can select it.

Asset Link: Used to link assets, like backups, to offerings.

Asset Qty: This displays the recorded quantity within ServiceView for any selected assets.

Qty From: This gives you the option to choose whether you want to use the "Use Asset" value which will use the recorded latest value of the asset within ServiceView or whether you want to override this value by saying "Use Qty" instead, which you then use the next "Qty" field to input the quantity that you want it to display manually.

Qty: Displays quantity value (can be from the use asset or the use qty field). The quantity for each line item added will be totalled automatically to give you the quantity that will be displayed for the offering unless the "Override Line Items" check box is ticked on the Offering page. In this case it will use whatever quantity is manually input in the Quantity box on the Offering tab.

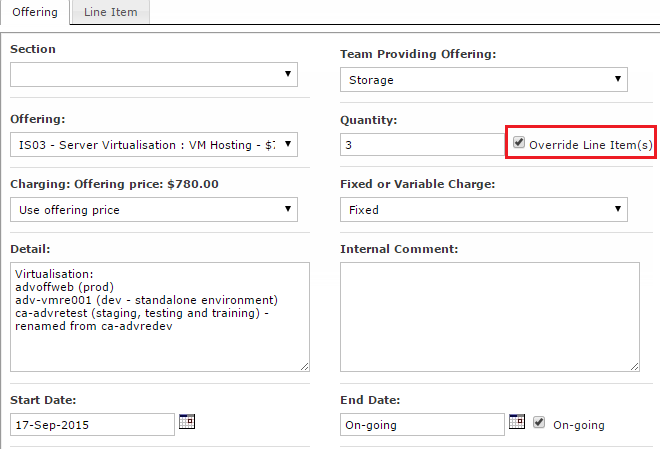
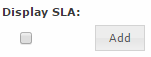
Display SLA button: Tick this button if you want the line item details that you have entered in the "Line Item" and "Comment" field to display on the SLA PDF document underneath the offering information.

Note: Only information from the "Line Item" and "Comment" fields are displayed in the SLA document.
Once you have entered the information that you wish to include for the line item, use the Add button on the right and this will add the line item to the table below. You can then add more line items following the same process and once added they will appear in the table also.

Decommissioning of Equipment
When equipment becomes decommissioned, or is scheduled to be decommissioned, service providers or the Client Service team can use the decommissioned feature to adjust the equipment's status. If the equipment has been linked to an SLA in a line item, this will create a flag on the offering where it has been linked, which serves as a reminder for the SLA manager to adjust the offering. An incident is also created within the incidents table visible from a users Home page, which also serves as a reminder to adjust the SLA accordingly.
To decommission equipment, firstly navigate to the Infrastructure side menu and select Equipment.
Use the search bar to search for the equipment name from the table.
Select the Edit button. The Edit Equipment dialog should now open.
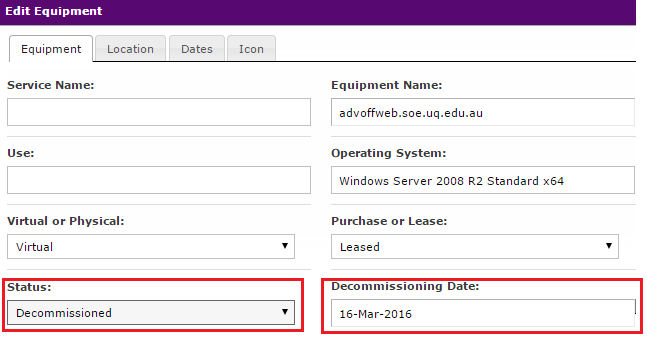
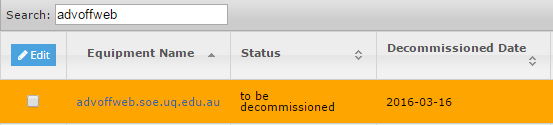
You will notice that in the equipment table, the equipment is now shaded in grey to indicate that it has been "decommissioned" with a decommissioned date listed, or shaded in orange to indicate that it is "to be decommissioned" with a decommissioning date.
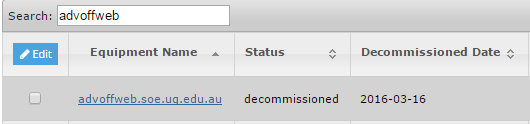
If the equipment that you have just updated as decommissioned is linked as a line item within an SLA client, navigate to that client ot see the new flag status that is displayed at the end of the offering.
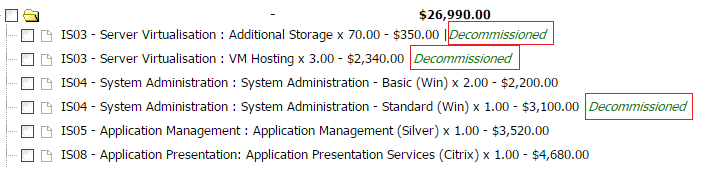
You can also double click to open one of the offerings and go to the line item tab to see the status of the equipment has been changed in the line item also.
If you no longer wish to include this equipment as part of the quantity total, for example, the IS03 Server Hosting, IS04 Sys Admin or IS13 Data Backup offering, then change the quantity for the line item with decommissioned equipment to 0 and save. This will update the total for the offering, provided you do not have the "Override Line Items" box ticked on the main Offering tab.

Note: Changing the quantity to 0 for the line item will also remove the "decommissioned" flag for the offering that appears in green at the end.
Notifications of decommissioned equipment:
When the equipment is marked as "decommissioned" or "to be decommissioned" an Incident will be created in the table that is visible from a users Home page and will be visible to anybody who has been given acces to the Client Services - SLA job queue for incidents.
It will display the information of what has been changed and needs updating in the SLA. Users will also receive an email notification that the incident has been created.
If you are unable to see the Incidents table or are not able to see any Incidents in the table whereas other users can, you may not be in the correct job queue for incidents (Client Services - SLA job queue), in which case contact a ServiceView administrator to be added.
Some incidents will have a link to the point in the SLA the equipment is referenced to and you can click on this link to take you to the part of the SLA that needs updating.
Linking Assets (Backups to an SLA)
Assets in ServiceView include backups, databases and websites.
The main asset used within the SLA module is backups for the IS13 Data Backup offering. Asset values update on a monthly basis based on the backup consumption for servers imported into ServiceView.
Similarly to equipment, you can use the line item feature within an offering to link backups to the data backup offering to see the most recent backup figure for the asset.
Process
Navigate to the client that you are wanting to link the asset for by using the SLA tab and Clients list.

When adding a new offering for the client or editing an existing offering (by double clicking on it), use the line item tab to input the asset information.
Currently the SLA clients that have the backup offerings, you can then link the backup of the server as an asset in this line item area for IS13 Data Backup offerings.
IS13 Data Backup Service: Backup Data Fee offering
Firstly, enter optional information into the "line item" or "comment" field if you want to put some reference information in there.
Then enter the server (equipment) name that is being backed up in the "Equipment" field by starting to type the equipment and selecting it from the auto complete list.
Then in the "Asset Link" field, start typing the name of the server (equipment) and an auto complete list of options will come up for that server. You will see that for the one server, there will be 2 options, one that says (Backups/Gigabytes) and another for (Backups/Licenses).
The backups/gigabytes option should be used for the IS13 Data Backup Service: Backup Data Fee offering and this will automatically populate the latest backup consumption figure for the server into the "Asset Qty" field when selected.
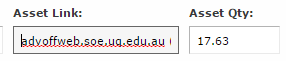
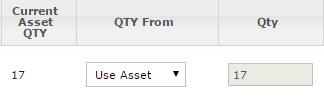
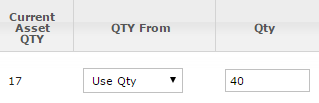
You then have the option in the "Qty From" field to use the asset quantity that has ben populated or to manually input one in the "Qty" field if you wish to use an allocated consumption.
For the above example, if you wanted to use the asset consumption figure in ServiceView, you would change the "Qty From" field to say "Use Asset" and it will automatically take the asset value as the "Qty".
Alternatively, if you wanted to input your own consumption figure in ServiceView, you would change the "Qty From" field to say "User Qty" and then input the quanitiy value you wish to use in the "Qty" field.
Once complete, then use the Add buton to add the line item. If you have no more line items to add, then select Save.
IS13 Data Backup Service: Backup Service and License Fee
Firstly, enter optional information into the "Line Item" or "Comment" field if you want to put some reference information in there.
Then enter the server (equipment) name that is being backed up in the "Equipment" field by starting to type the equipment and selecting it from the auto complete list.
Then in the "Asset Link" field, start typing the name of the server (equipment) and an auto complete list of options will come up for that server. You will see that for the one server, there will be 2 options. One that says (Backups/Gigabytes) and another for (Backups/Licenses). The backups/licenses option should be used for the IS13 Data Backup Service: Backup Service and License Fee offering and this will automatically populate the field with a quantity of 1, as there is 1 backup data fee charged per server.

Once complete, then use the Add button to add the line item, If you have no more line items to add, then select Save.
Linking a Service to an SLA
Services can be linked to an SLA client in two ways in order to show that a particular service is being run or used by an SLA client.
- The main way services are linked to an SLA is by linking the service directly to the section it corresponds to for the client.
- At the time of creating the service, the service owner or person entering the service details can also select an SLA client that the service is for.
Linking a Service to a Section Within an SLA Client
Navigate to the SLA clients tab and select the client you are wanting to link the service to.
Select the version of the client, e.g. current version for year 2016
If the section does not already exist, use the Add Section button to add it.

Once the section exists, double click on the section to open it and within the first tab called Section you will see a field for Service. Start typing the name of the service that you wish to link and once it comes up from the auto complete list click to select it and then click Save.
You will then see that at the end of the section, the service name is now displayed in blue to indicate that the service has now been linked to that secion.

Now that the service is linked ot the appropriate section within the SLA, if the status of the service changes to say decommissioned, then a flag will occur at the end of this section to prompt the relationship manager to adjust the components of that section aaccordingly.
Assigning a Service to an SLA at the Service level
When a service is being entered into ServiceView initially by the serivce or technical owner, there is an SLA field which can be used by the person entering the service to indicate that the service is part of an SLA.
When an SLA is chosen for a service, this created an incident for the SLA admins in the Incident table on the Home page noting that somebody has indicated that a particular service belongs to an SLA client and serves as a prompt for the relationship manager to the nadd he service ot the SLA if need be or link the service to an existing section.
Process:
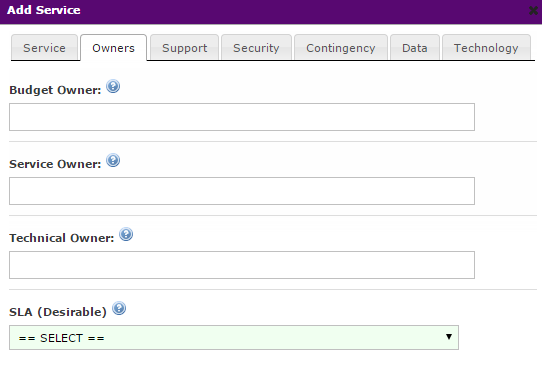
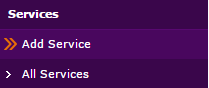
When adding a service using the Add Service button users will see a tab for "Owners" which contains a SLA field that they can use from the drop down list of clients to select which SLA the service is for.
The drop down list of SLA clients will only be displaying "current" versions of clients, so if a client is not listed in this field it may be that there is no current version stored for them within ServiceView.
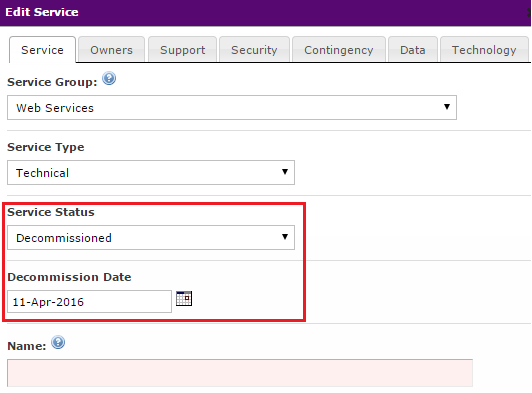
Decommissioning of a Service
When a service becomes decommissioned, or is scheduled to be decommissioned, service providers or the Client Service team can use the decommissioned feature to adjust the services status. If the service has been linked to an SLA via a section, this will create a flag on the service where it has been linked, which serves as a reminder for the SLA manager to adjust the offering. An incident is also generated for all SLA admins in the incident table, which also serves as a reminder to adjust the SLA accordingly.
To decommission a service, you need to first bring up that service by either searching for it in the main search window on the left and selecting Go when you have the service populated.
Or
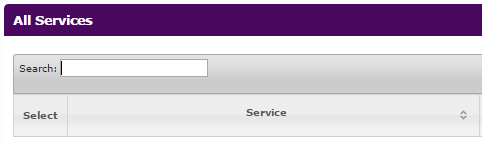
By going to the Services tab on the side menu and selecting All Services and then finding the service from the table.
Then click the Edit Service button.
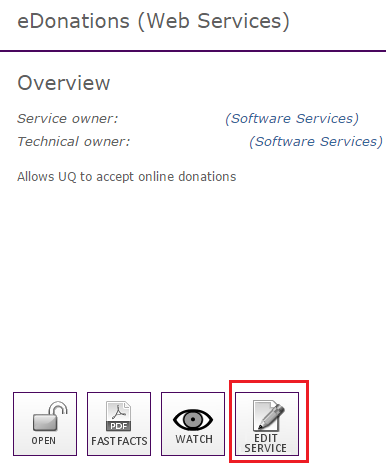
On the main Service tab, change the status of the service to "decommissioned" or "to be decommissioned" and supply the decommissioning date and press Save.
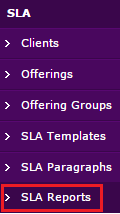
Reports
There are several different types of reports available within the SLA Reports section that you can use to extract SLA information within ServiceView.
SLA Report by Offering Group
The SLA Report by Offering Group report is the most comprehensive report and is basically an overview of all the offerings for a client, as well as lists information such as the team providing the service, relevant section within ServiceView, price and client version.
This report has 2 different versions that you can run:
Current SLA Report by Offering Group: This filters the report to only display/grab information from any "current" versions of SLA clients.
Draft SLA Report by Offering Group: This filters the report to only display/grab information from any "draft" versions of SLA clients.
To generate this report, navigate to the SLA tab on the side menu and select SLA Reports.
Then use the scroll bar to select the clients you wish to include in the report, whether that be individual clients or "All SLA Clients".

Then select either the "Current" or "Draft" report type for the "SLA Report by Offering Group".

Once you have selected the report, click Generate Report. This will display the contents of the report within the screen.

To then download the report information into a spreadsheet format, click the Download Data button.

Templates Used by SLA Clients Report
This report allows you to see what templates are being used by each client version to produce the paragraphs that make up the PDF.
To generate this report navigate to the SLA side menu and select the SLA Reports field.
Then use the scroll bar to select the clients you wish to include in the report, whether that be individual clients or "All SLA Clients".
Then select the Templates Used by SLA Clients report from the drop down list.

Once you have selected the report, click the Generate Report button. This will display the contents of the report within the screen.

To then download the report information into a spreadsheet format, click the Download Data button.

Services for SLA's from Owners Tab Report
This report displays a list of all the services in ServiceView, the service group they have been allocated to, as well as the client code of the SLA client, if they have been assigned to an SLA from the Edit Service Owners tab for the service.
This report can be used to check services have been assigned to the correct SLA's by service owners at the point of entry and can be used to see which services have not been assigned to SLA's so this function can then be performed.
To generate this report, navigate to the SLA tab on the left menu and selct the SLA Reports field.
Then select the Services for SLA's from Owners tab report from the drop down list.

Once you have selected the report, click Generate Report. This will display the contents of the report within the screen.

To then download the report information into a spreadsheet format, click the Download Data button.

SLA Client Section Services Report
This report displays a list of SLA clients and any secitons for that client that a service has been linked to.
The report can be used in conjunction with the Services for SLA's from Owners tab report to conduct a service audit, by checking (where relevant) that services that have been assigned to an SLA from the owners tab have also been assigned to the relevant section withinthe client.
To generate this report, navigate to the SLA tab on the left menu and selct the SLA Reports field.
Then select the SLA Client Section Services report form the drop down list.

Once you have selected the report click Generate Report. This will display the contents of the report within the screen.

To then download the report information into a spreadsheet format, click the Download Data button.

General
What Can Non SLA Users View Within The SLA Component (SLA Clients Tab)
The SLA component within ServiceView (the SLA tab on the left) is only viewable to those who have been assigned SLA admin rights.
All ServiceView users however, have access to the SLA Clients tab from their Home page

This tab contains the following 2 sections:
My Clients
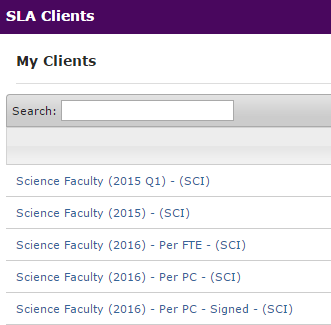
This lists all of the clients a user has been granted access to either view or edit from their Client Access tab within an SLA client.
Users can click on the clients from within the My Clients table and this will take them to that client within ServiceView where they can either view the client or edit it depending on their access level.
SLA Clients

This table lists all of the published versions only of SLA clients where users have the option to download the SLA PDF for that publishd (signed) version so they can view a copy of the most current signed SLA from here.

Users can also view a copy of the Fast Facts for the SLA client (if applicable, as some clients do not have specific services or applications being supplied in the SLA).

Users can also download a copy of the Offerings by Team Supplying Service report and select which clients they want to see the SLA offerings for. This report can be useful for service providers as they can go in to ServiceView at any time and produce a list of all the offerings they are supplying and to which clients and they will also get the offering details for each.

Fast Facts Document
The Fast Facts document supplies information on services relevant to an SLA client.
The Fast Facts document is generated based on/from a client and can include just selected services that you require information for or all of the client's services (the services portfolio).
The information supplied on the Fast Facts document is all automatically populated from stored data within Service View, except for the report period and the chosen services to be included.
To download the Fast Facts document, go to the SLA side menu and select the Clients tab.
Then select the current version of the client that you are wanting to view the Fast Facts for.
Note: The Fast Facts document only uses information for the "Asset Consumption Information" section from current client versions. So, if you have asset information linked as a line item for a client, then ensure that you are generating the Fast Facts from the current client version.
Then use the drop down field at the top right of the screen and choose the Fast Facts option from the drop down and then select Download.

This will bring up the "Download Client Service Fast Facts" dialog.
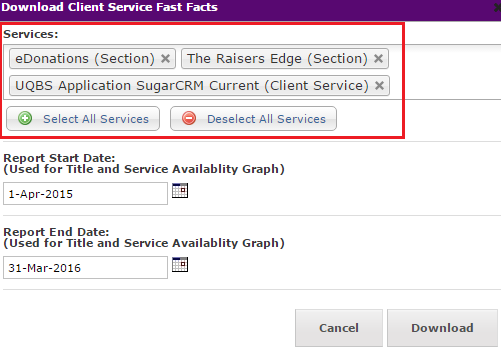
You may notice for some clients that the services might appear twice in the list, one with (Section) at the end and the other with (Client Service). If this is the case, you will see the following message in yellow:
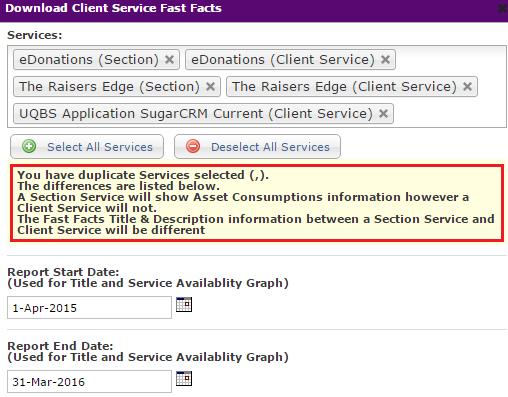
Section Service: The section service means ServiceView has picked up that the service has been linked to a section within the SLA client that you have chosen, examples below.

Client Service: The client service means ServiceView has picked up that the "SLA" field in the Owners tab for the service has the SLA client sleected that you have chosen as the SLA.
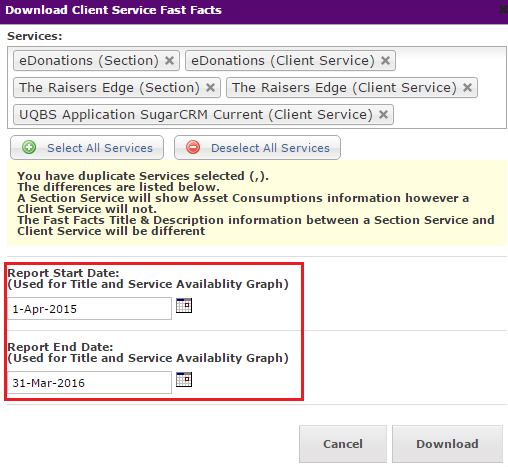
When generating the Fast Facts, the date fields will automatically populate with the previous years data starting in the month prior to the current month for the previous year.
You can, however, change the start date and end date using the calendar if you wish.
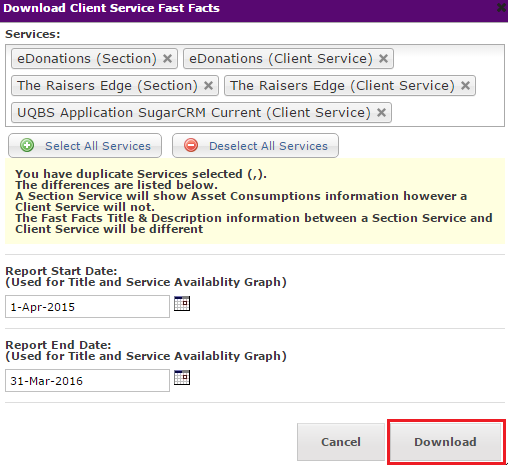
Use the Download button to generate the Fast Facts in PDF format.
Add Client Tabs Explained
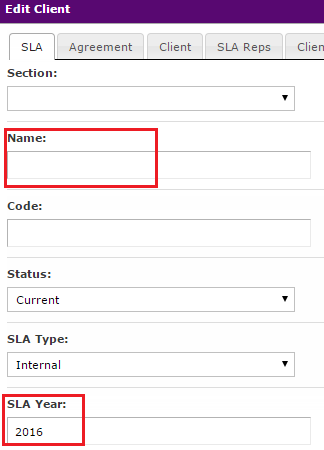
SLA Tab
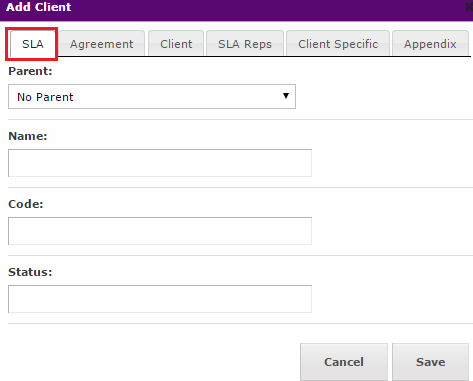
Parent: Most clients should have no parent. The parent feature is used to represent relationships between clients. For example: For a school within a faculty that has it's own SLA but is also part of the Faculty SLA, you would select the Faculty SLA as the parent.
Name: Clients official name.
Code: Client Code.
Status: Used to disinguish between current agreements with current data and older client copies with old data or draft versions of client.
Live: The current live SLA document with current details.
Working Copy: Draft versions that have not been approved yet or older version.
Agreement Tab
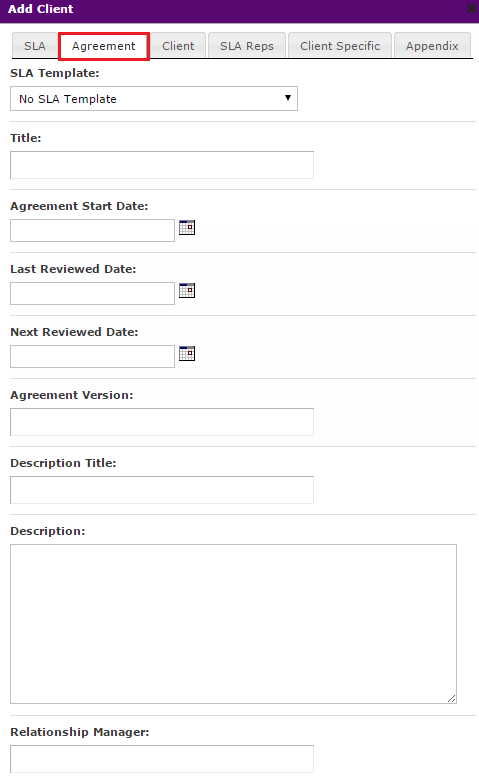
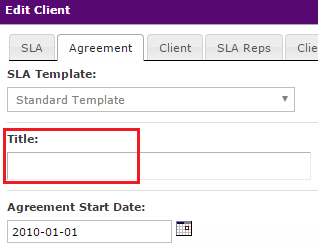
SLA Template: Templates contain the general terms and conditions for the agreement as well as provide the format/layout for the PDF document. A master template must be selected in order ot produce a PDF SLA agreement document. You can view the templates available from the SLA side menu and selecting the SLA Templates or create a new template for the client from there if it does not follow the standard format.
Title: The title of the agreement that will appear as the title of the SLA PDF document.
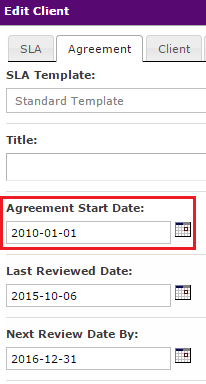
Agreement Start Date: Date agreement commences, generally the first day of the year.
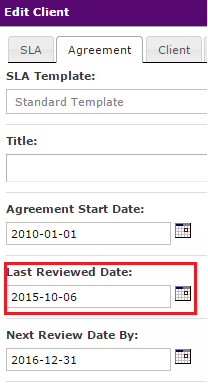
Last Reviewed Date: Date the agreement was last reviewed.
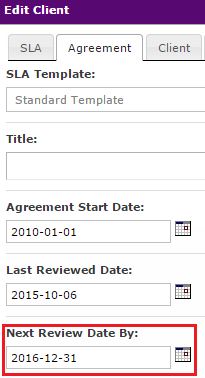
Next Review Date: The date that the next annual review of the SLA will take place, generally the end of the year.
Agreement Version: The version of the agreement, e.g. V3.
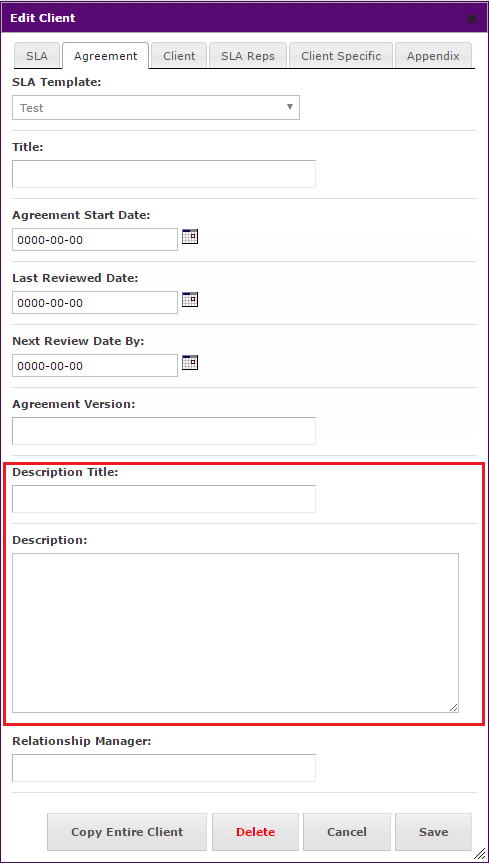
Description Title: Free text field for title, mostly used for Faculty clients to list organisation units, in the case of Faculty SLA's title would be "Client Organisational Units".
Description: Free text field for body, mostly used for Faculty clients to list organisation units.
Relationship Manager: Organisation representative that manges this SLA.
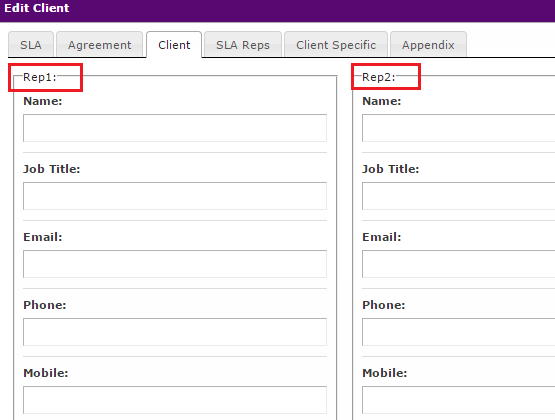
Client Tab
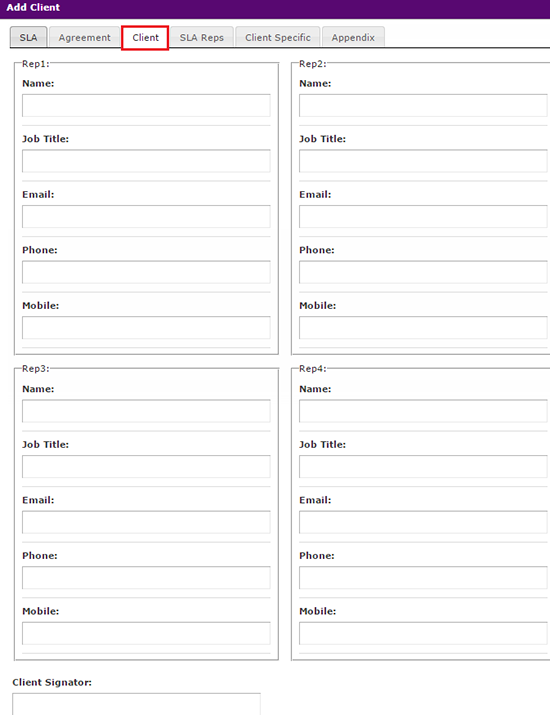
This section is for the client's representatives that are contacts for the agreement. The client signator section is for the name and position of the client that signs the SLA agreement document.
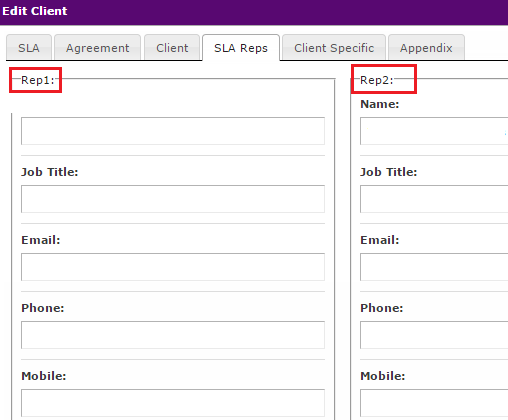
SLA Reps Tab
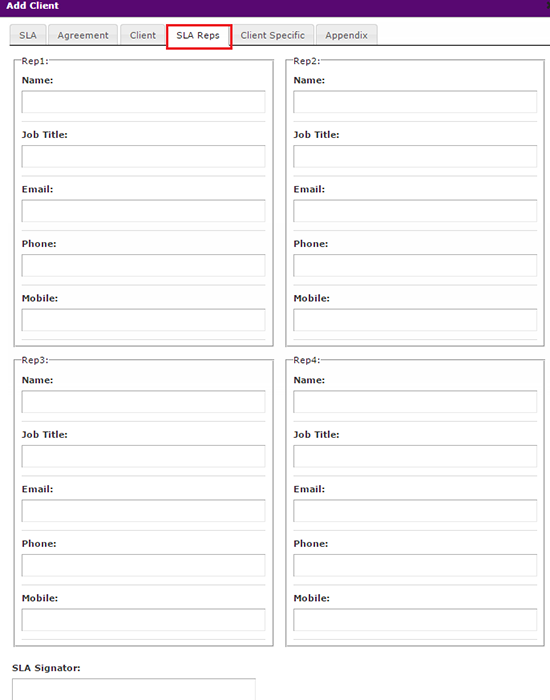
This section is for the ITS representatives that are the contacts for the agreement and for the relationship manger. The SLA signatior section is for the name and positon of the ITS representative (Executive Officer or Director) that signs the SLA agreement document.
Client Specific Tab

This section is for terms and conditions of the agreement or client information that are specific to the client and would not be included already under the template.
Appendix Tab
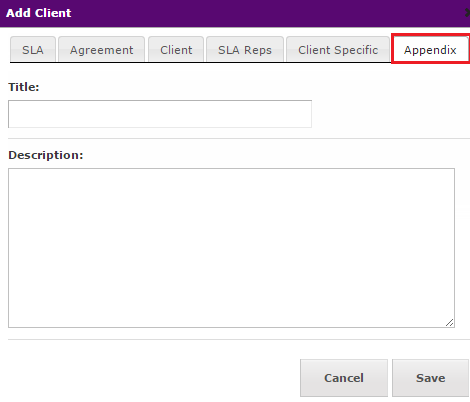
The appendix section can be used for any client information but is mostly used for TT05 AV schedule tables and the version control for the document. The appendix section will appear at the end of the agreement when produced.
Add Client Offering Explained
Offering Tab
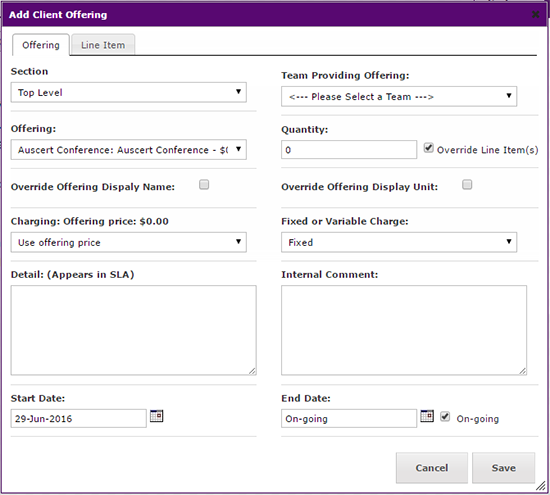
Section: Choose the section you want the offering to display under. The sections act like folders but can also be used to tie services to in the case of applications.
You do not have to choose a section when adding the offering, if you leave the section as "Top Level" then the offering will appear directly under the client name. You can then use the drag and drop feature to move the offering to another section at a later point.
Offering: Use the drop down list to select the relevant offering or service catalogue item. The offerings are pre-determined and there is no add your own type option. If there is no matching offering for an item you wish to add, you can use the SLA side menu and select the Offerings tab to add an offering to the list. You should be careful when doing this however, as all offerings should matc hservice catalogue items.
Charging: Thee Options for Charging:
- Use offering price: Use the standard offering price stipulated in the offering.
- Use agreed unit price: Uses an agreed price based on units, e.g. there are a quantity of 2 servers for this offering and I want each server to be charged at $500, to total $1000. An agreed unit price of $500 would be chosen.
- Agreed total price: A total price that can be input regardless of quantity for the offering.
Detail: Any specific details that you want to include for the offering. Anything in this field will appear on the final SLA PDF document.
Start Date: The date the offering commences from, usually the 1st day of the current year of the agreement.
Team Providing Offering: Select the service provider within ITS from the list.
Quantity: How many units for that offering, e.g. for an offering of file storeage that is per GB, if you put a quantity of 10 that would equal 10GB of storage.
Fixed or variable charge: It will select fixed by default but this is to indicate if this price is fixed for the year or if it changes throughout the year for variable charges based on consumption, e.g. file storage.
Internal Comment: An internal ITS only field, for internal comments that will not appear on the SLA PDF document.
End Date: Will be ongoing by default but you can select an end date for an offering, if you know it will only be required for a certain period of time.
Line Item Tab
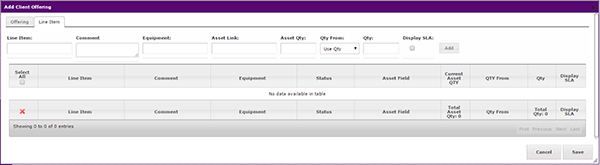
You can use the line item tab to tie equipment (servers) to an offering and to tie assets (backups, databases and websites) to an offering.
Line Item: The description of the line you are entering, e.g. the application that the server is for or server details, etc. If the "Display SLA" box is ticked the information in the line item will display in the SLA PDf document.
Comment: Free text field that can be used for detailed information, e.g. CPU's or memory, etc. If the "Display SLA" box is ticked the information in the comment will display in the SLA PDF document.
Equipment: Using auto complete you can search for server names in here that you can tie the offering to by starting to type the server name and then a list will come up to choose from.
Asset Link: Using auto complete you can search for server names in here that you can tie the offering to by starting to type the server name and then a list will come up to choose from. Asset names will be displayed twice as the GB backup quantity and the license component.
Addet Qty: You do not need to complete this field. Asset Qty values in here will display automatically once the asset name has been selected in the field.
Qty From: Is the GB asset quantity that displays once you have linked the asset is not correct or not what you want to display in the agreement you can use this field to say "Use Qty" which will then display the quantity as whatever number is input in the field. Otherwise you can select "Use Asset" which will then display the quantity as the cnumber that automatically came through fro mthe backup feed when the asset was linked.
Qty: Use this field to manually input a quantity for backups if you do not want to use the asset quantity that comes through automatially from the feed whe nthe asset is linked. If inputting a quantity in here to use ensure you change the "Qty From" drop down to the "Use Qty" option.
Add button: Once you have filled in the details forthe line item, use the Add button and the line item will then appear in the table displayed underneath. You can add mltiple line items to the one offering and they will all display in the table.
Display SLA: Ensure this is ticked if you want the details of this line item to display in the SLA PDF document.
Note: Only the Line Item, Comment and Qty fields will display in the document. Any tied equipment or assets will not display in the PDF.
Fast Facts Document
Section 1:
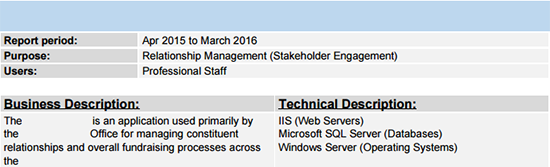
The name of the service appears in the title bar at the top.
The Report period is based on the start date and end date that was supplied in the "Download Client Service Fast Facts" window before the document is generated.

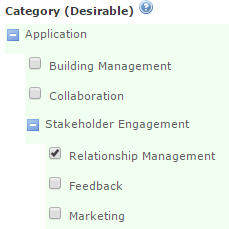
The information in the Purpose field is populated from the Contingency tab in the Edit Service window, using the Category field.

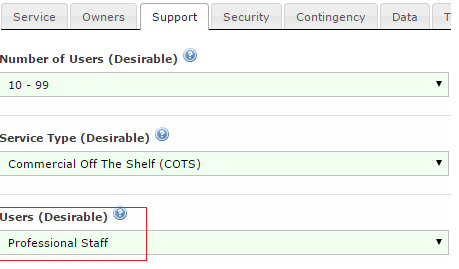
The information in the Users field is populated from the Support tab in the Edit Service window, using the "Users" field.
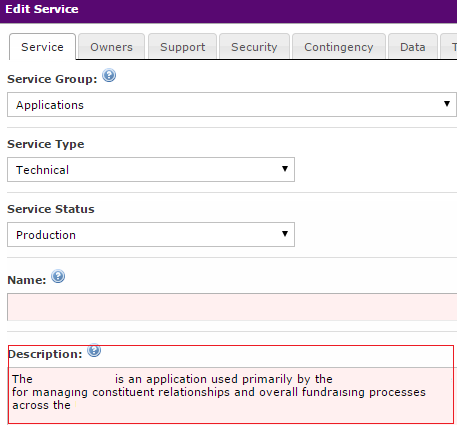
The Business Description field is populated from the Service tab within the Edit Service window, using the "Description" field.
The Technical Description field is populated from the Technology tab within the Edit Service window, using the "Technology" field.

Section 2:
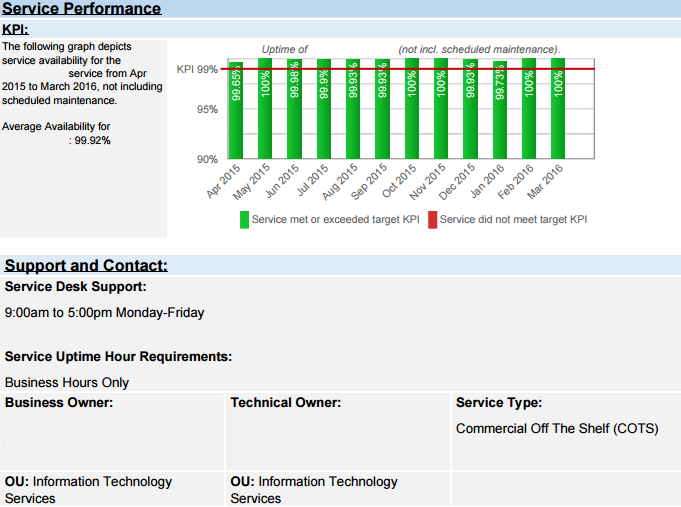
The KPI graph is automatically generated using the availability information stored for the service based on Service Status information within ServiceView.
The Service Desk Support hours are automatically populated as a stored field and cannot be changed as they are standard for all services.
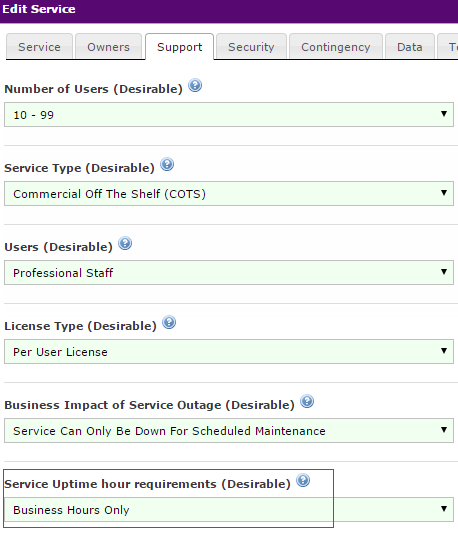
The Service Uptime Hour Requirements is populated from the Support tab within the Edit Service window, using the "Service Uptime hour requirements" field.
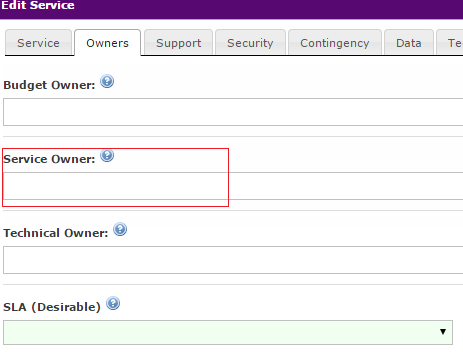
The Business Owner field is populated from the Owners tab within the Edit Service window, using the "Service Owner" field.
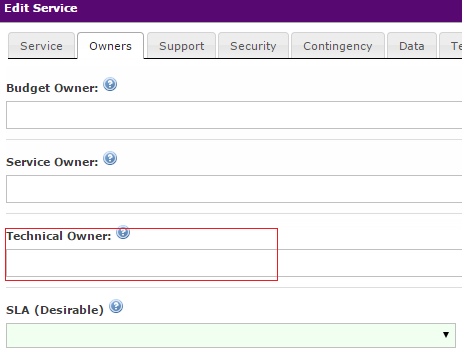
The Technical Owner field is populated from the Owners tab within the Edit Service window, using the "Technical Owner" field.
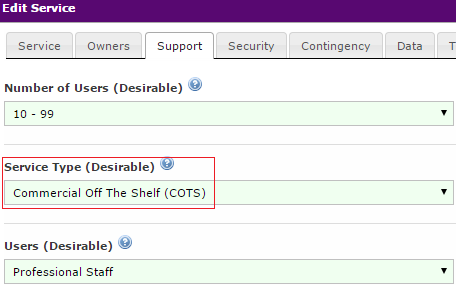
The Service Type field is populated from the Support tab within the Edit Service window, using the "Service Type" field.
Section 3:
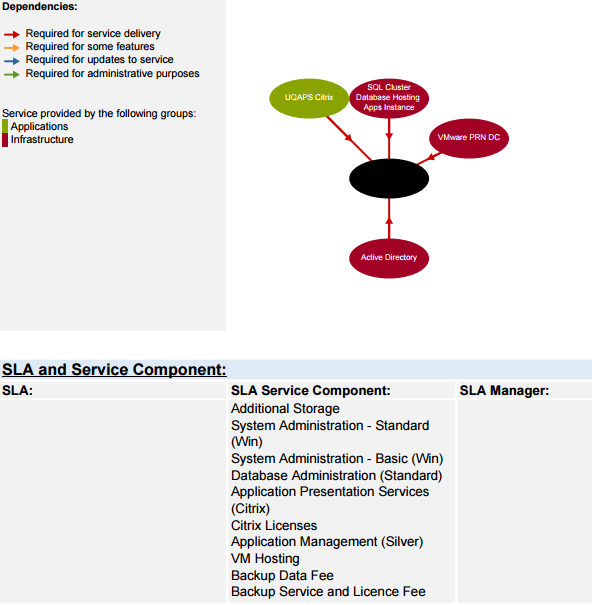
The Dependencies graph is linked to the Dependencies tab for the service and displays the relationship between this service and other services. The service bubbles are colour coded to display by the service group that the service has been categorised under.

The SLA field displays the name of the SLA client that the service has been linked to. If a service has been linked to more than one client then the "SLA and Service Component" will be displayed for each client.
The SLA and Service Component section lists all of the offerings for the service, based on what offerings are listed underthe section that the service, based on what oferings are listed under the section that the service has been linked to.
The SLA Manager information is populated from the Agreement tab within the Edit Client button for the client, using the "Relationship Manager" field.
Section 4:
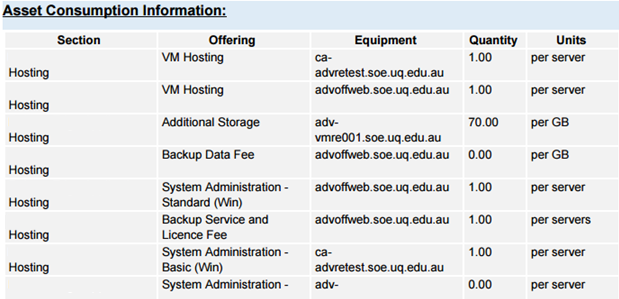
If there are line items containing assets for any offerings under the section that the service has been linked to, the line information will display in the "Asset Consumption Information" field.
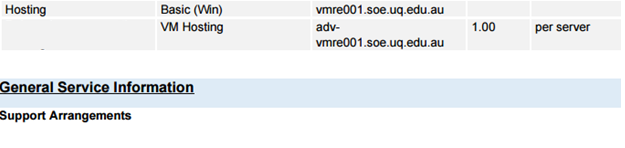
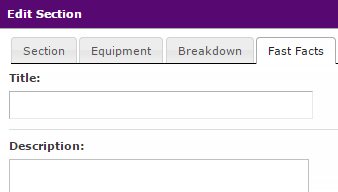
The General Service Information displays any information that has been manually entered for a section that a service has been linked to through the "Fast Facts" tab in the Edit Section window.
SLA PDF Document
The following is an example of an SLA PDF that may be generated including an explanation of where the information that is included in the PDF is populated from ServiceView.
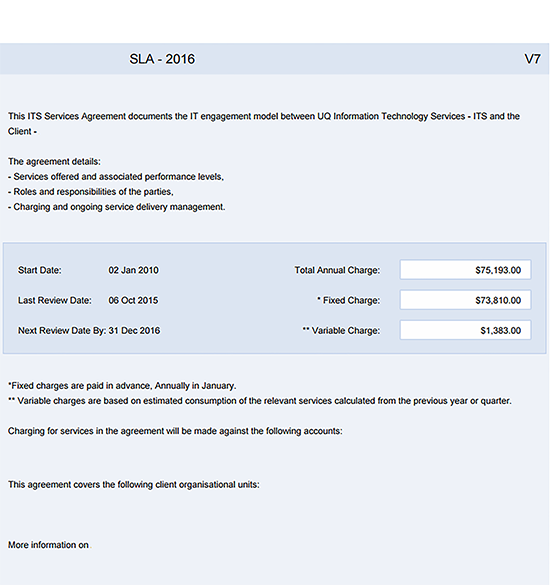
The name of the agreement is populated from the Edit Client window, using the "Name" field and also add the "SLA Year" field to the end if there is one specified.
This is populated from the "Agreement Details" paragraph that is included in the standard template.
It also substitutes the Client Title from the Edit Client window in the "Agreement" tab at the end of the first sentence.

The "Start Date" is populated from the Edit Client window Agreement tab in the "Agreement Start Date field".
The "Last Review Date" is populated from the Edit Client window Agreement tab in the "Last Reviewed Date" field.
The "Next Review Date By" is populated from the Edit client window Agreement tab in the "Next Review Date By" field.
The "Total Annual Charge" is populated by adding up all of the offering prices as well as any service costs from the Sections.

The "Fixed charge" field adds up all the offerings from the secitons that have been selected as "Fixed" charges in the "Fixed or Variable Charge" field.
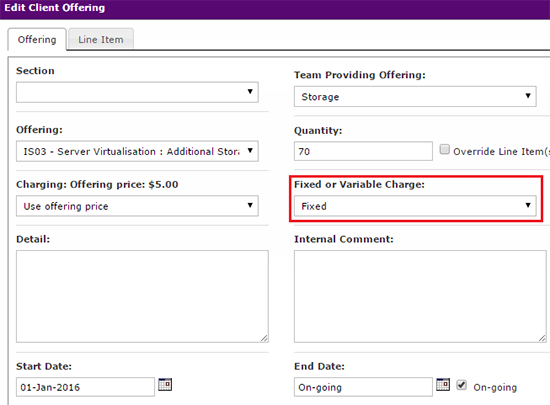
The "Variable Charge" field adds up all the offerings from the sections that have been selected as "Variable" charges in the "Fixed or Variable Charge" field.
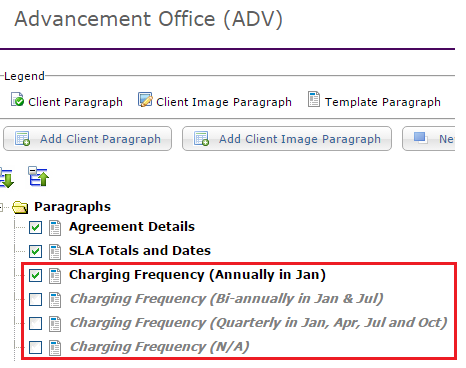
This Charging Frequency part comes from a paragraph. There are 4 different paragraph options for charging frequency that has been assigned to the Standard Template, so will display, when the standard template is selected.

There are 4 different paragraph options for charging frequency included in the standard template listed below that will populate and the user can select which paragraph is applicable to their client.
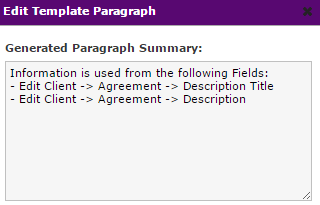
The information displayed in this spot on the PDF documents comes from the Edit Client window Agreement tab in the "Description Title" and "Description" fields.
In the Layout tab when you double click on the paragraph, it displays where the information is coming from on the PDF.

The footer which is displayed on each page automatically displays with page numbers, the name and year of the SLA agreement from the Edit Client window SLA tab and the date the agreement is generated.
Page 2:
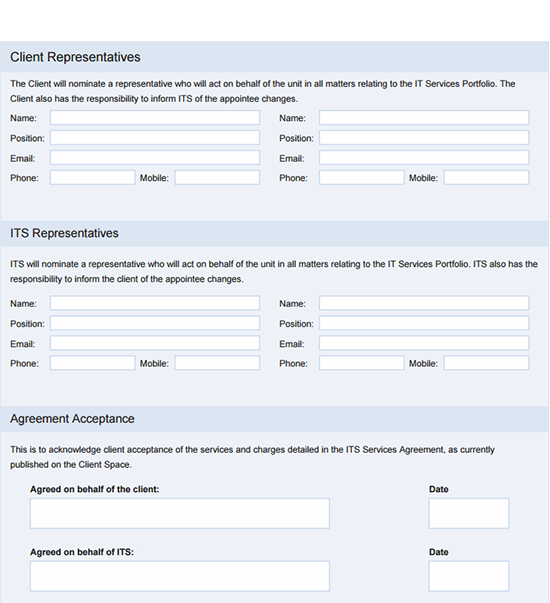
The Client Representatives information is a paragraph within the Standard Template, that displays the client information from the Edit Client window Client tab.
The ITS Representatives information is a paragraph titles "SLA Representatives" within the Standard Template, that displays the ITS reps information from the Edit Client window SLA Reps tab.
The Agreement Acceptance section is a paragraph titled "Signatures" within the standard template, that displays the Client Signator and SLA Signator from the Edit Client window Client and the SLA Reps tabs.


Page 3:

These are all standard paragraphs, with standard data that does not change across all clients within the Standard template.
Page 4:
These are all standard paragraphs, with standard data that does not change across all clients within the Standard template.
Page 5:
These are all standard paragraphs, with standard data that does not change across all clients within the Standard template.
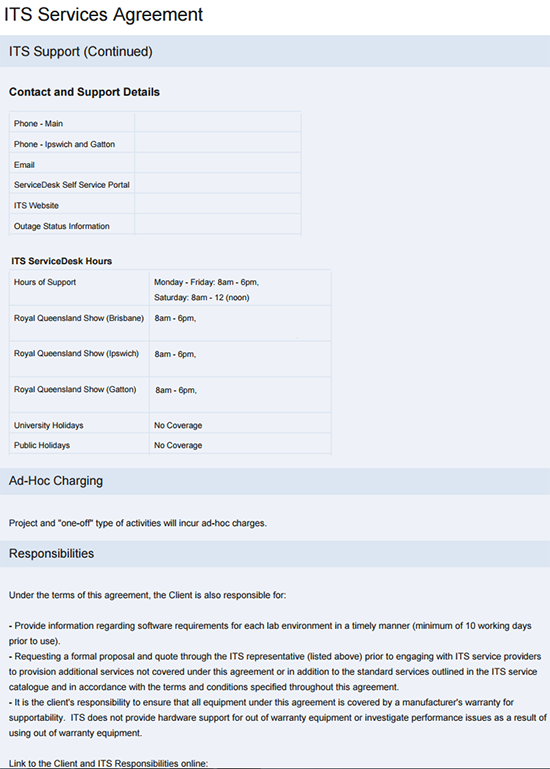
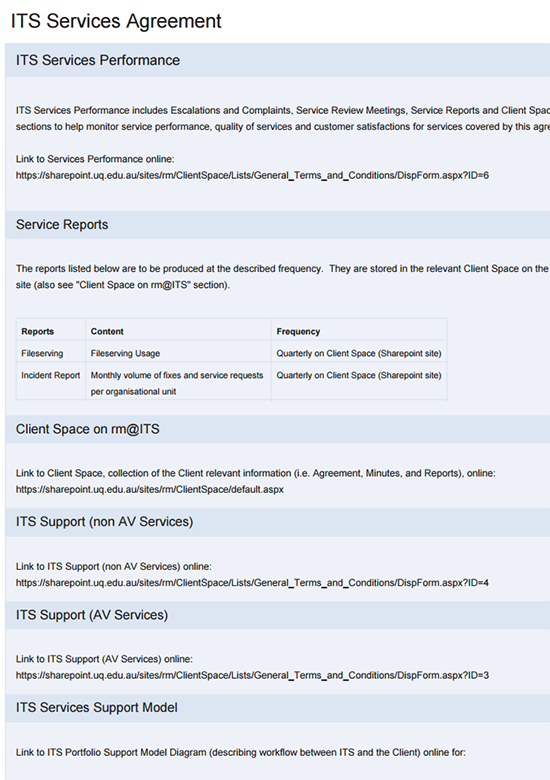
The "ITS Support (non AV Services)" information is a paragraph within the Standard Template, that displays the ITS support information with the SharePoint link.

The "ITS Support (AV Services)" information is a paragraph within the Standard Template, that displays the ITS support information with the SharePoint link.
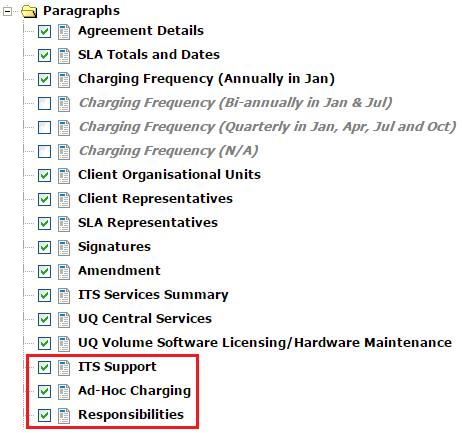
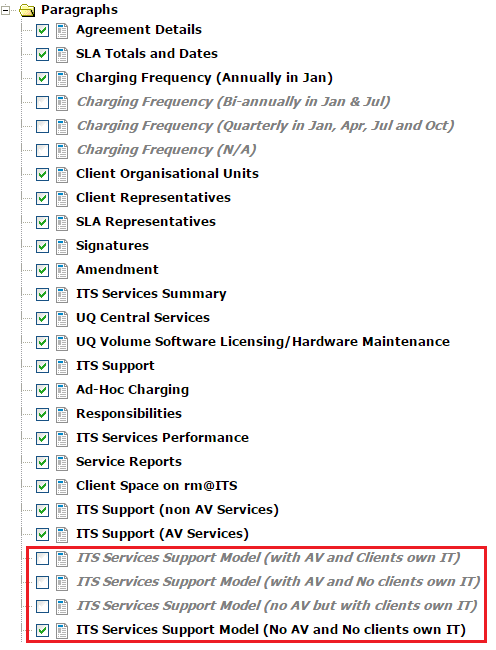
The "ITS Services Support Model" contain 4 different paragraphs with the different support options within the Standard Template. Users can then select the relevant paragraph to their client by selecting the tick box for the correct one and unselecting the others.
Page 6:
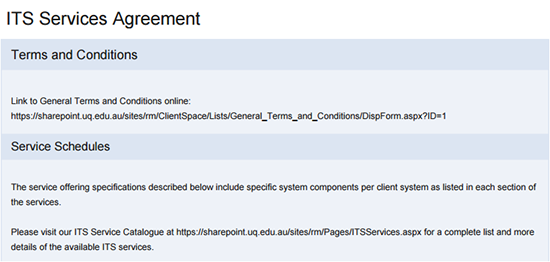
The "Terms and Conditions" information is a paragraph within the Standard Template, that is a standard paragraph used across all clients.

The "Service Schedules" information is a paragraph within the Standard Template that is a standard paragraph used across all clients.
Page 7:
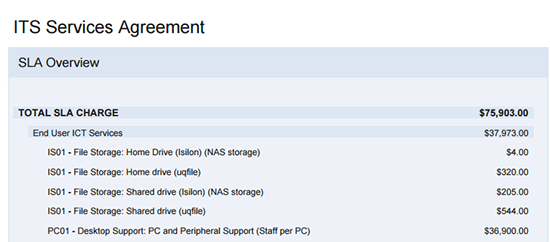
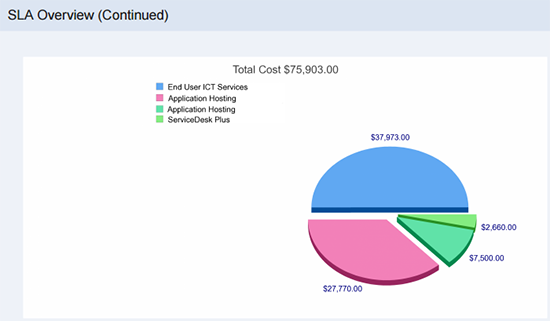
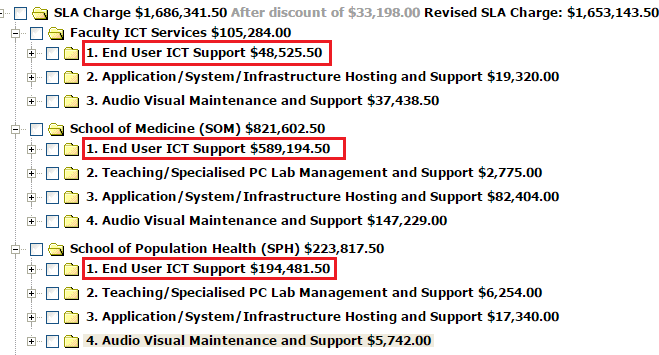
The "SLA Overview" section is a paragraph within the Standard Template that automatically gathers and displays all of the sections and the offerings within those sections (without the information in the details field) and gives each section a sub total as well as an overall SLA charge total.
This "SLA Overview" also automatically displays a graph with each section within theSLA used as a piece of piewiththe total price for the section.
Note: This graph is automatically populated unless there is less than 2 sections for the SLA, in which case it will not appear. There is also no option to remove this graph as it is automatically displayed.
Page 8:
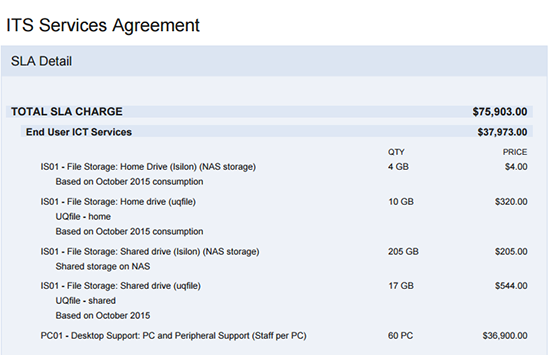
The "SLA Details section is a paragraph within the Standard Template that automatically gathers and displays all of the sections and the offerings within those sections and also includes the information in the details section for offerings. This is the main section within an SLA PDF with the detailed SLA information.
Page 12:
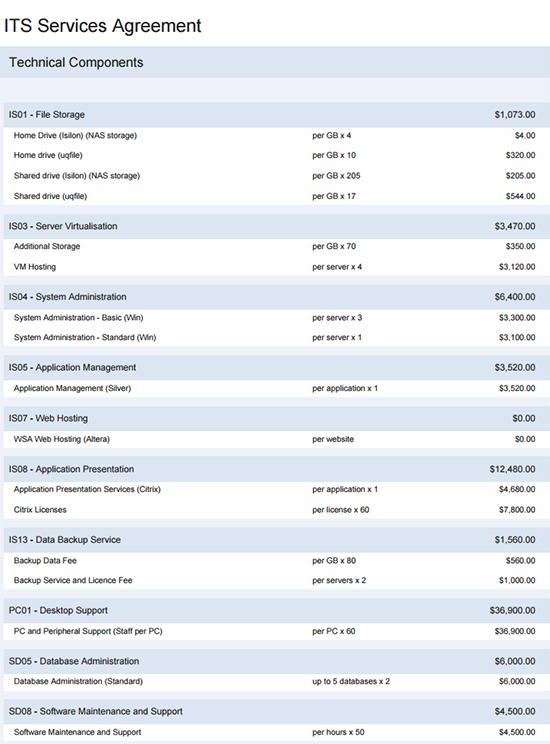
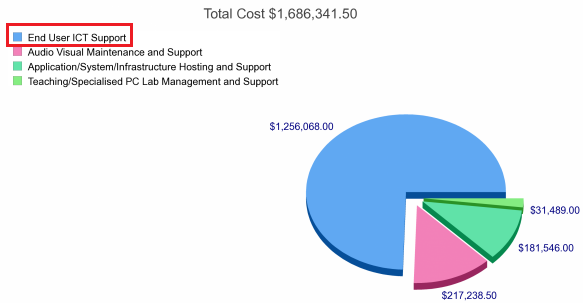
The "technical Components" section is a paragraph within the Standard Template that automatically gathers and displays the offering information by offering group and then summarises or groups together the offerings within that group.
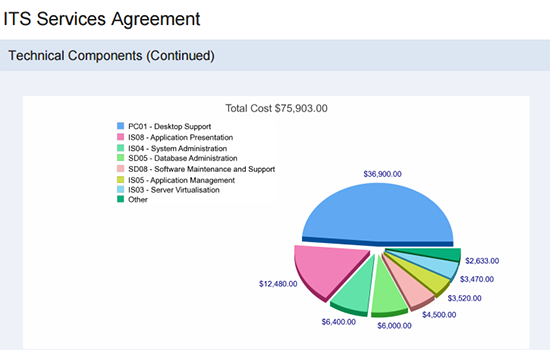
This "Technical Components" also automatically displays a graph with each offering group within the SLA used as a piece of pie with the total price for that offering group.
Note:This graph is automatically populated unless there is less than 2 offering groups for the SLA , in which case it will not appear. There is also an option to remove this graph as it is automatically diaplayed.
Glossary of Terms
Below are some of the terms you will be see within the SLA module in ServiceView.
Client Cost: This is the cost that is passed on to the client, worked out using the percentage of cost to include (100% = 100% of Total Cost, 50% = 50% of Total Cost etc.)

Note: For Services that are shared amongst clients, Service Cost will remain the same across all clients. Client Costs vary based on the percentage allocated amongst clients sharing the services.
Service Cost: This is the total cost of all services in a section that are being charged to the client, this figure doesn't include any offering costs/prices.

Total Cost: This is the total cost for a service. The percentage of cost to include option uses this amount to determine how much of this amount is passed onto the Client in the Client Cost figure.
